
In a rush? Skip straight to the Artisan-Style Sourdough Bread recipe at my Tumblr or you can jump to my Just the Basics section.
I’m a bit of a coward. With many of my recipes, I take one glance and think, “Nope. Too hard. I don’t have time for that.”
But I’ve learned to be a bit more adventurous in my baking. Bread-venturous, I suppose. I saw this no knead artisan-style sourdough bread recipe and thought that it would be a fun challenge to tackle. And if I failed, I could share the awful experience with everyone and laugh at how bad my bread turned out.
Funnily enough, I nailed this recipe the first time around.
Or I think I nailed it.
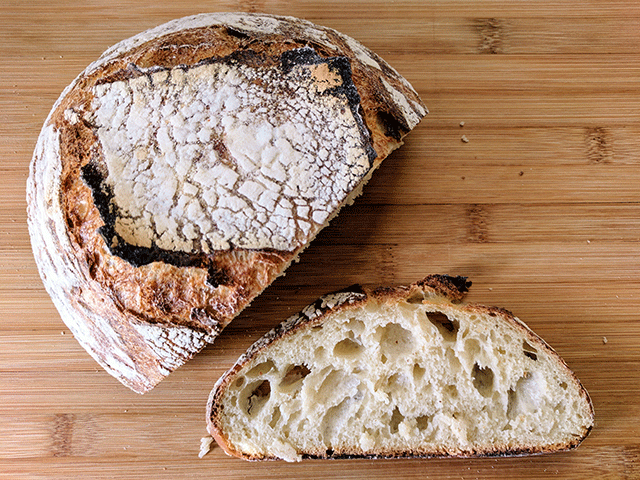
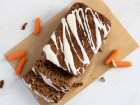
I’m not an artisan baker, so I wouldn’t be able to tell you if the slice below was over-proofed or under-proofed or poorly made. But I can tell you that it was delicious.
If you want a picture-perfect bread that you can share on Instagram and Facebook, or if you simply want to take your sourdough to the next level, give this no knead artisan-style sourdough bread recipe a try over the weekend.
Time
Prep time: 15 to 30 minutes
Rise time: 18 Hours to 34 1/2 Hours
Cook time: 45-55 minutes
Total time: Approximately 20 Hours to 35 Hours
Ingredients
For simplicity, I’ve broken this no knead artisan-style sourdough bread recipe into two parts. The first part is the leaven, which you’ll prepare the night before you start baking.
Leaven
- 75 Grams (1/2 Cup) All-Purpose Flour
- 75 Grams (1/3 Cup) Water
- 14 Grams (1 Tablespoon) Sourdough Starter
Dough
- 700 Grams (5 1/2 Cups) All-Purpose Flour
- 525 Grams (2 1/2 Cups) Water
- 17 Grams (1 Tablespoon) Salt
That’s it! Just flour, water, salt, and starter. No eggs, milk, or butter are needed.
Additional Equipment
This no knead artisan-style sourdough bread is by the far the most complicated recipe I’ve tried so far, and it does require a few tools that you might not normally have in your kitchen. Here’s what you’ll need to make this loaf:
- Small Mixing Bowl
- Large Mixing Bowl
- Wooden Mixing Spoon
- Measuring Cups and Spoons
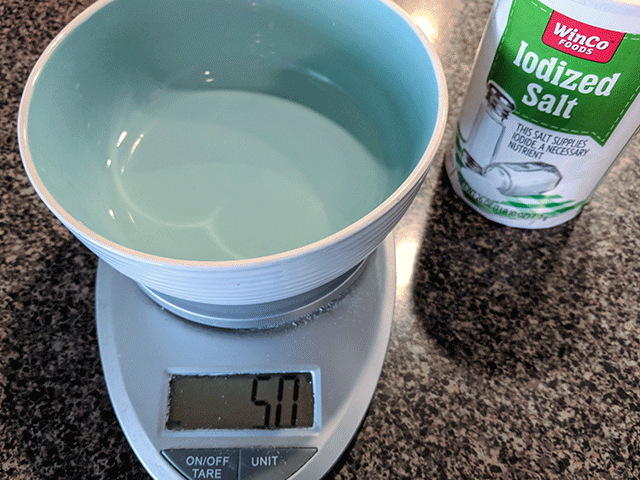
- Measuring Scale
- Pastry and Dough Cutter
- 2 Proofing Baskets
- 2 Dutch Ovens
- Bread Lame
Fortunately, this recipe does have room for flexibility. If you only have one Dutch oven, for example, you can bake each loaf one right after the other. And if you don’t have a bread lame, you can use a sharp knife instead. I highly suggest using a measuring scale over cups and spoons for precision’s sake, but I provided both weight and volume so you can use the most convenient option.
Just as a heads up, I am an Amazon associate. If you do purchase from the above affiliate links, I receive a small commission. Thank you for your supporting my site.
Instructions
This no knead artisan-style sourdough bread is a long, drawn-out affair with baking. Even if you do the minimum rise times, you’ll still need to devote most of your day toward caring for your dough. Although you can make this recipe whenever you like, I think it’s easiest for a lot of people to try making the recipe over the weekend. Begin Friday night, work with the dough on Saturday, and then bake Sunday.
Friday Night: Start Your Leaven
If Friday night is your party night, then don’t panic. You can still start your bread and enjoy the rest of your evening without too much fuss. In fact, the first step of this no knead artisan-style sourdough bread recipe is the easiest.
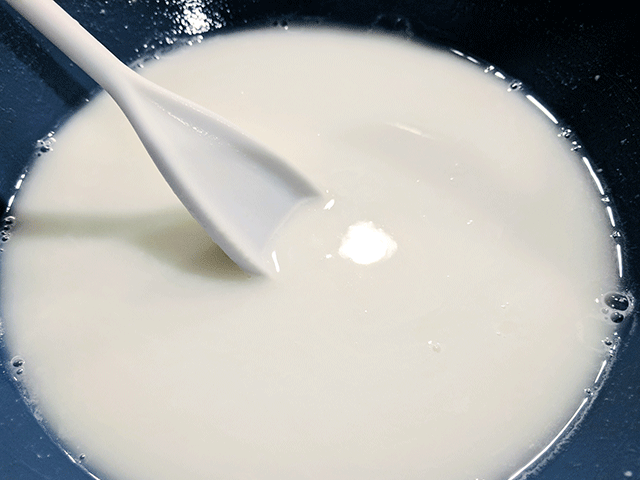
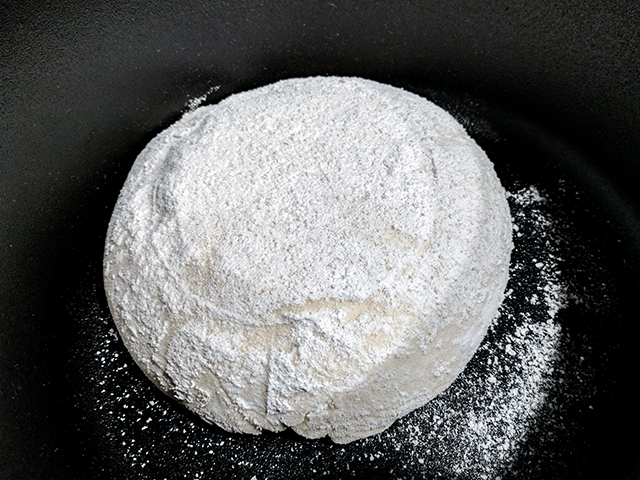
Just mix 1 tablespoon of your sourdough starter with 1/2 cup flour and 1/3 cup water (or better still, use a scale to measure exactly 75 grams of water and flour). Stir everything together and let it sit over night, about 12 hours.
In the morning, your leaven will look a bit like the picture below.
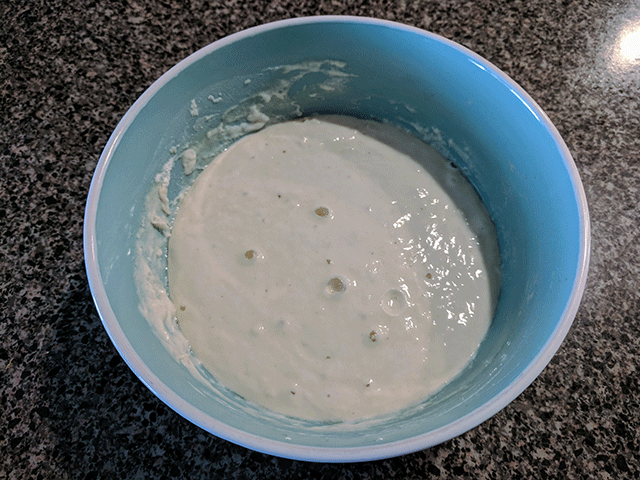
A few bubbles on the surface or some froth will let you know that your starter is active and ready to go.
Saturday: Make Your Dough
You’ve had all Friday night to party and Saturday morning to sleep in. Now it’s time to check on your leaven and get to work on that no knead artisan-style sourdough bread.
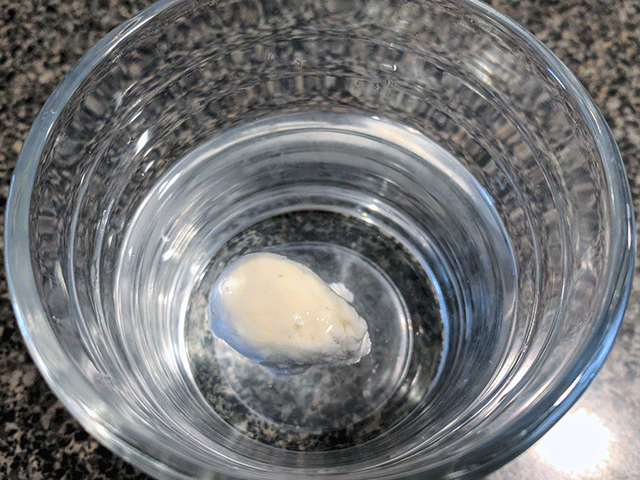
Pass the Float Test
To see if your leaven is ready, take a small spoonful and plop it in a glass of water. If the leaven floats, you can use the rest for baking. If it sinks, give your leaven another hour or two and try again.
Once your leaven is ready, dissolve 1 tablespoon of salt in 1/4 cup (50 grams) of water. Stir occasionally to ensure all the salt dissolves. Set the salt water aside for later.
Add Your Leaven
Next, pour the rest of your leaven in a large mixing bowl and combine it with 2 cups (475 grams) of water. Stir until the leaven breaks up and dissolves. It’s okay if you have a few clumps remaining, but you’ll want to mix it as thoroughly as you can.
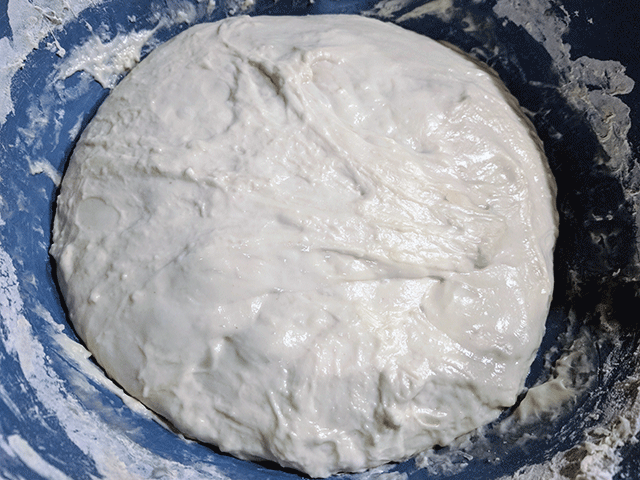
When you’re ready, add 5 1/2 cups (700 grams) of flour. Stir until a thick, shaggy dough forms and you’ve incorporated all the flour. At this point, the flour may feel too dense and thick to stir. Cover your dough and let it rest anywhere from 30 minutes to 4 hours. During this stage, the flour will absorb the water, and the enzymes in the leaven will break down proteins and starches in your dough.
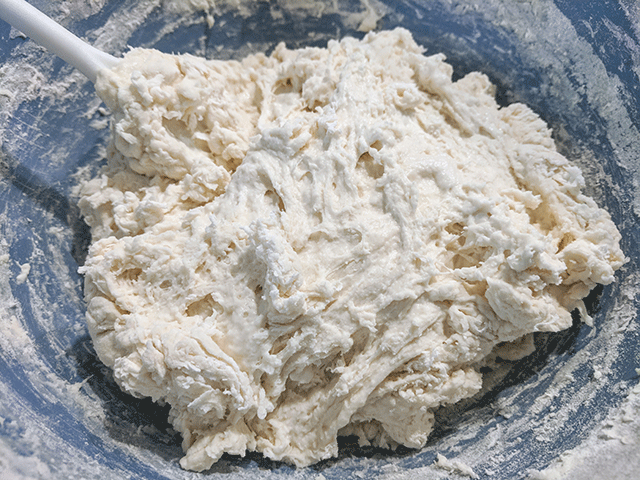
If you let your dough rise for the full 4 hours, it might rise a little, but it won’t look too impressive. In fact, your dough will probably look a bit gross, and it will only look uglier and weirder from here.
Pour in the salt water and work in the liquid by squeezing and pinching the dough.
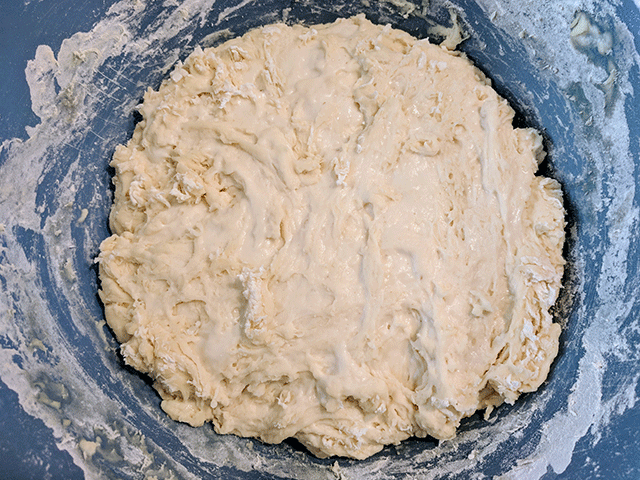
Your dough should feel wet, soggy, sloppy, and loose. Don’t worry, it will come together.
Stretch and Fold
Now, this “no-knead” recipe may seem a bit misleading. Although you won’t knead the dough, you will need to fold it multiple times over the course of 2 1/2 hours. This folding process gives your bread a better structure and lovely network of holes when you bake.
Fortunately, folding takes less work than kneading the bread. Simply grab one “corner,” stretch it up, and pull it to the center. Turn the bowl a 1/4 turn and grab the next corner, stretch it up, and pull it to the middle. Repeat until you’ve folded all 4 corners. Let the dough rest for 30 minutes, and then start folding again. You’ll need to do 6 folding sessions total.
Don’t worry if your dough doesn’t hold any shape when you fold. With each folding session, the dough will become smoother and stretchier, but it will still look messy.
After folding, let your dough rise for 30 to 60 minutes.
Divide Your Dough
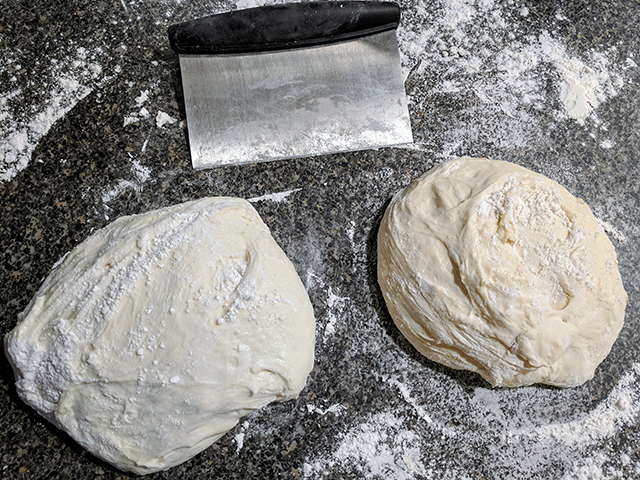
This next step in this no knead artisan-style sourdough bread recipe may seem a little tricky if you’ve never used a pastry cutter or dough chopper before. But don’t worry. This is only the first shaping, not the final shaping, so it doesn’t have to look pretty.
Gently turn your dough out onto a floured surface and cut the dough in half. Sprinkle a little flour over each half of the dough as well as over your pastry cutter. Slide your pastry cutter under the outer edge of the dough and turn the cutter like you would a steering wheel, pulling the edges of the dough around in a circle. Keep sliding and turning around all the edges of the dough until it loosely resembles a circle. Sprinkle more flour over your cutter as needed to prevent the dough from sticking too much.
Repeat for the other half of the dough and let both rounds rest for 20 to 30 minutes.
While your dough rests, prepare your proofing baskets (or if you are making a swap, prepare two mixing bowls and their towels). Generously dust the lining or cloth with a layer of flour. Rub the flour into the bottom and sides of the material with your fingers. Don’t worry about using too much flour. It’s better to use too much than too little, as the flour will keep the dough from sticking to your proofing basket.
Shape Your Loaves
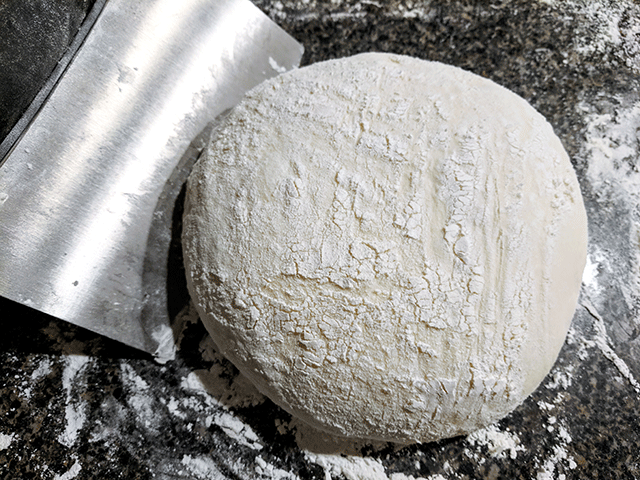
After your dough has rested and your proofing baskets are floured, you’re ready to shape again! Even if your first shaping looked like poop, your second shaping will help the dough really come together and look like something you could be proud of.
Slide your pastry cutter under one “corner” of the round and use it to fold the edge to the middle, like you are folding a letter (and much like you folded the dough earlier). Repeat with each side, but when you get to the last edge, gently roll the dough so your round is right side up. If your dough doesn’t look as taught or round as you would like, use your hands to cup the edges inward.
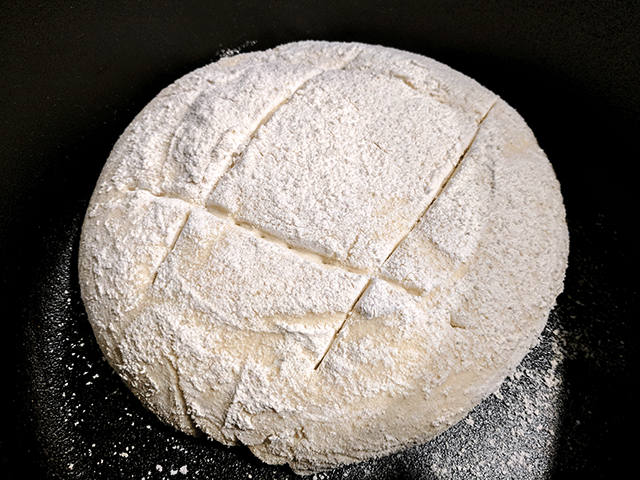
Repeat the shaping process with the second loaf of dough, and then sprinkle even more flour on top of each round. Place each round in their proofing baskets, and make sure the seams from the shaping are facing up toward you and the smooth edge is on the bottom of the basket. As your rounds rise, they’ll take the shape of the basket and give your bread a more professional appearance.
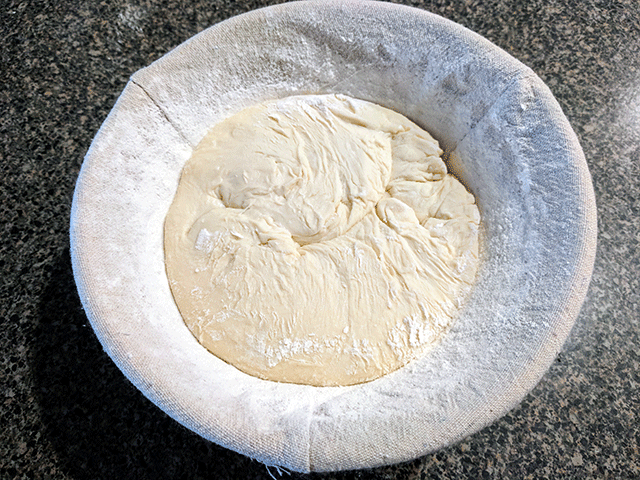
If you are in a rush and want to bake the same day, cover your baskets with plastic and let your rounds rise for 3 or 4 hours before moving on to the next step. If you let your bread rise the maximum time, then you’ve probably reached the end of your baking day. Rather than leaving them out on the counter to rise, pop them in the fridge and let them rise over night, about 12 to 15 hours.
Sunday: Score and Bake Your Bread
After a day of mixing, folding, and shaping your dough, you probably can’t wait to try your no knead artisan-style sourdough bread. Your patience has paid off, and now it’s time to cook those gorgeous rounds and see what flavors await you.
Place your two Dutch ovens in your oven and preheat to 500 degrees Fahrenheit (260 degrees Celsius). When your oven hits the desired temperature, remove one of the Dutch ovens and carefully tilt the proofing basket over the oven so the round lands seam-side down. It’s fine if your round doesn’t land in the exact middle.
Score Your Dough
Use your bread lame (or a sharp knife) to score your bread. Try to cut at an angle so you’re cutting almost parallel to the dough, and aim to cut about 1/4 inch deep. If the dough seems especially sticky despite its night in the fridge, wet your blade between cuts.
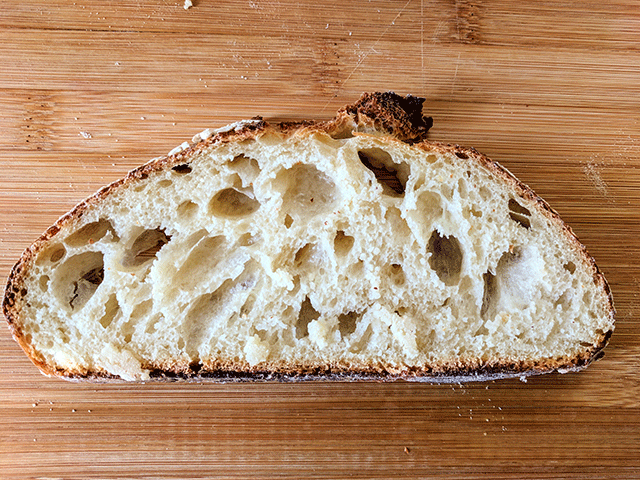
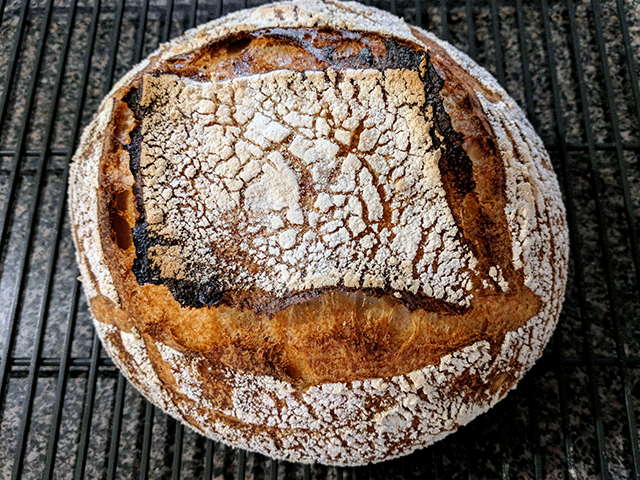
I scored my bread in the shape of a hashtag (#breadbythehour), but you can do a single slash down the middle, a spiral, a cross-hatch pattern, or any other design you’d like. The slashes allow your bread to expand during baking, giving your bread a distinct “shelf” or “ear.” Additionally, the scoring will prevent your loaf from bursting at any weak points, so your bread has a smoother, more professional appearance.
Bake Your Bread
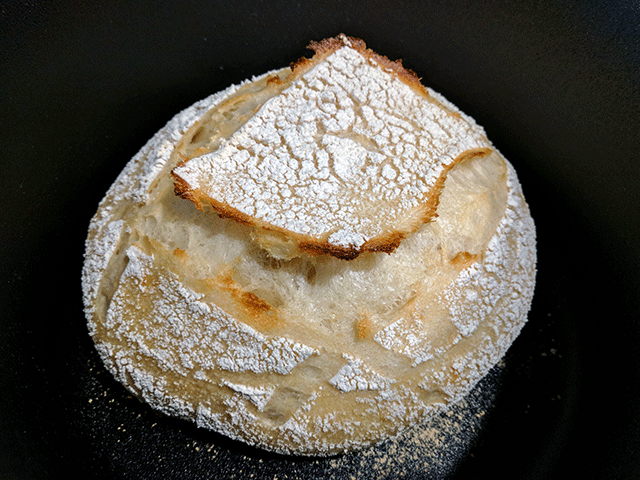
Replace the lid and put your loaf in the oven. If you have a second dutch oven, repeat with the second round. Bake the loaves for 20 minutes.
At this point in the baking process, you may feel tempted to take a peek at your bread as it bakes. Don’t look just yet! Just reduce the temperature to 450 degrees Fahrenheit (232 degrees Celsius) and bake for another 10 minutes.
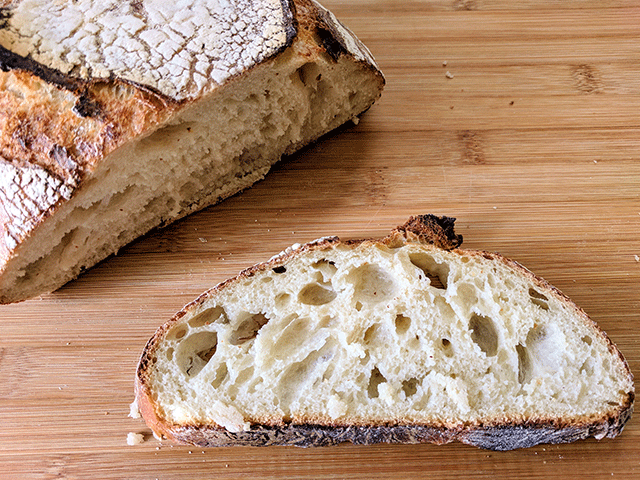
After baking at 450 for 10 minutes, you can remove the lids from your Dutch ovens. If you were to look at your bread, you’d see that it has a faint gold color, and it may have risen quite a bit in the oven. But your bread still isn’t done.
After you’ve removed the lids, bake your bread for another 15 to 25 minutes. You want to cook until the crust is just shy of burnt to ensure the middle bakes thoroughly.
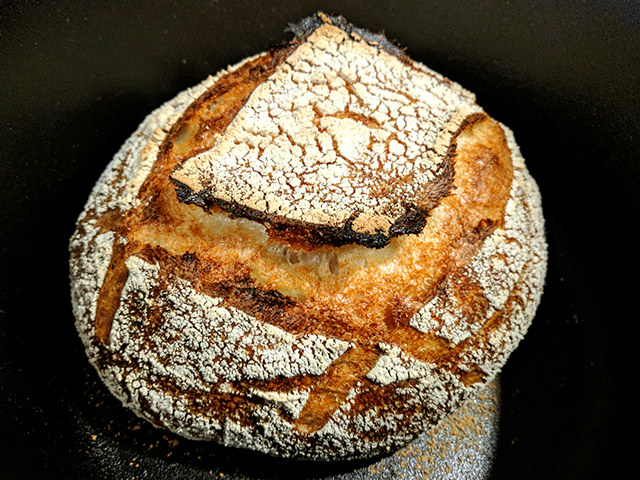
When you’ve finished baking, use a spatula to lift the loaves out of the Dutch ovens and place on a cooling rack.
Allow the bread to cool completely before slicing. If you cut into it too soon, the middle may turn a bit gummy.
Congratulations! You are now an artisan baker. Enjoy the sweet taste of success, and feel free to show off your finished loaf to your friends and family.
Secrets to Success
This no knead artisan-style sourdough bread is possibly the hardest recipe I’ve ever attempted. Each step of the way, I worried that I would mess up.
But I do have a secret for success: just let it sit! The great thing about this recipe is the flexibility in the rise times. I could let my dough sit for hours while I tended to my daughter and cleaned the house.
Don’t try to rush through this recipe. The longer you let it rise, the more flavor your bread will have. Give yourself a weekend to make this artisan-style bread, and you won’t regret the end result.
Just the Basics
No-Knead Artisan-Style Sourdough Bread
Ingredients
Leaven
- 75 Grams All-Purpose Flour (1/2 Cup)
- 75 Grams Water (1/3 Cup)
- 14 Grams Sourdough Starter (1 Tablespoon)
Dough
- 700 Grams All-Purpose Flour (5 1/2 Cups)
- 525 Grams Water (2 1/2 Cups)
- 17 Grams Salt (1 Tablespoon)
Instructions
- Mix 1 tablespoon of your sourdough starter with 75 Grams Flour and 75 Grams water. Stir everything together and let it sit over night, about 12 hours.
- Dissolve 1 tablespoon of salt in 50 grams of water. Stir occasionally to ensure all the salt dissolves. Set the salt water aside for later.
- Pour the rest of your leaven in a large mixing bowl and combine it with 475 grams of water. Stir until the leaven breaks up and dissolves.
- Add 700 grams of flour. Stir until a thick, shaggy dough forms and you’ve incorporated all the flour.
- Cover your dough and let it rest anywhere from 30 minutes to 4 hours.
- Pour in the salt water and work in the liquid by squeezing and pinching the dough.
- Stretch and fold the dough. Let the dough rest for 30 minutes. Repeat for a total of 6 folding sessions.
- After folding, let your dough rise for 30 to 60 minutes.
- Gently turn your dough out onto a floured surface and cut the dough in half.
- Use a dough cutter to shape each dough half into a round. Let both rounds rest for 30 minutes.
- Final shape your dough with the dough cutter. Transfer rounds to floured proofing baskets, seam side up.
- Cover baskets and let rise for 3 to 4 hours at room temperature, or put in the fridge overnight for about 12 hours.
- Preheat your Dutch ovens inside your oven at 500° Fahrenheit (260° Celsius) at least 45 minutes prior to baking.
- Turn dough out into Dutch oven and quickly score. Replace lid and bake for 20 minutes.
- Reduce temperature to 450° Fahrenheit (232° Celsius). Bake for another 10 minutes.
- Remove the Dutch oven lid and bake for another 15 to 20 minutes.
- Turn out bread onto a wire rack and allow it to cool completely before cutting.
Notes
Nutritional Information
In addition to being one of the most flavorful breads I’ve ever made, this no knead artisan-style sourdough bread recipe is calorie-friendly, too.
I averaged about 10 slices per loaf, though you may be able to manage 12 depending on your cutting skills. Of course, the slices aren’t even, as some slices will be bigger or smaller as you get closer to the middle or the butt of the bread.
Did You Try It?
I’ve never made bread this complicated before, and I’ve had some disastrous loaves in the past. But if I can make this bread, then YOU can make this bread, too.
Be brave! Be adventurous!
Then tell me about your results in the comments below. If you want, send pictures. Impress me with your scoring patterns, or show off your perfect slices.

Hi !
After the final resting I let my bread in the fridge overnight and I’m ready to bake it . Do I need to let it be at room temperature or does it go directly from fridge to oven ?
Thanks
Hey there! No need to wait for room temp. You can bake straight from the fridge. Just make sure your Dutch oven is thoroughly heated first or it will stick.