
In a rush? You can cut straight to the White and Wheat Artisan Sourdough Bread recipe at my Tumblr or you can jump to my Just the Basics section.
Ever since I bought a wheat grinder, I’ve been excited about baking with home-milled whole wheat flour. Up until now, I’ve only read that home-milled flours were more flavorful and provided more depth than store-bought flours.
However, I was also worried about baking sourdough bread with whole wheat.
Although I’ve tried making honey whole wheat sourdough once before, it was a sandwich loaf and not an artisan-style bread. The sandwich loaf only used sourdough starter for flavor, and it used commercial yeast to do the heavy lifting.
But this week, I set aside my worries and gave this White ‘N’ Wheat Artisan Sourdough Bread recipe a try. And I’m so glad I did.
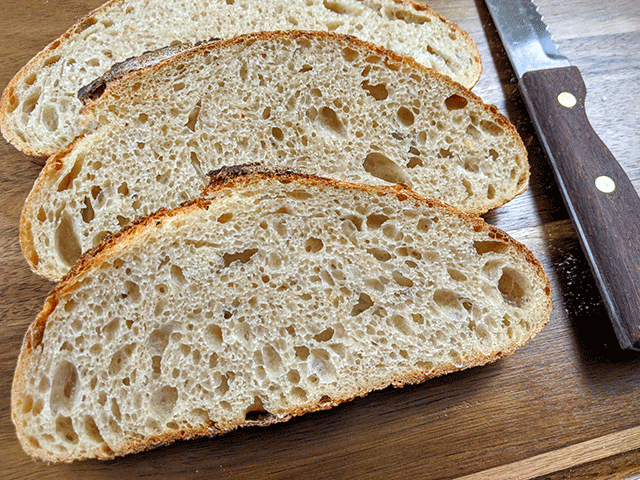
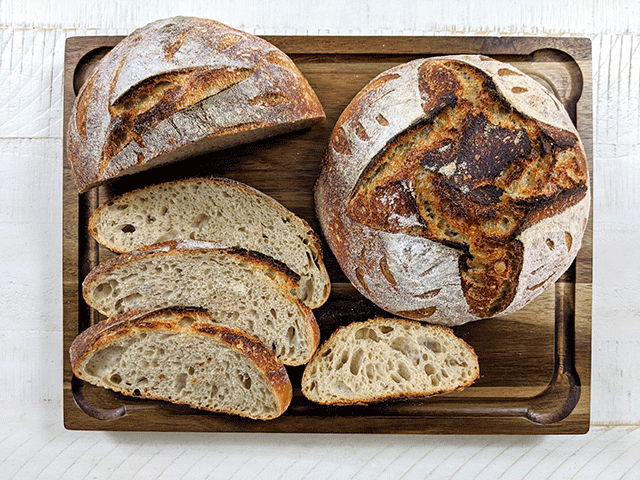
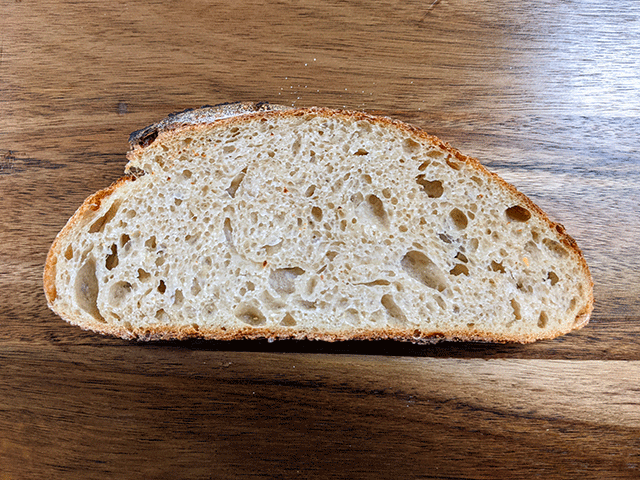
White ‘N’ Wheat Artisan Sourdough Bread combines the hearty, rich flavor of wheat flour with easy-to-use white flour. As a result, you get a lighter, airy bread with a nice chew.
Although I struggle to shape and score my dough, each loaf has tasted incredible despite any slip-ups along the way.
White ‘N’ Wheat Artisan Sourdough Bread has a learning curve to it. It also requires a few extra tools to make. But once you’ve got the basics, this recipe opens up a whole variety of fun artisan-style breads.
Time
Prep time: 15 minutes to 20 minutes
Rise time: 18 hours to 24 hours
Cook time: 40 to 45 minutes
Total time: 18 hours 55 minutes to 25 hours 5 minutes
Ingredients
White and wheat sourdough only needs a few ingredients:
- 350 Grams (3 Cups) All-Purpose Flour
- 50 Grams (1/2 Cup) Whole Wheat Flour*
- 300 Grams (1 1/3 Cup) Warm Water
- 100 Grams (1/2 Cup) Sourdough Starter**
- 8 Grams (1 1/3 Teaspoon) Sea Salt
*If you want a stronger whole wheat presence in your bread, you can adjust the flour totals. Instead of 350 grams white flour and 50 grams wheat, you can use 300 grams white flour and 100 grams wheat. Note that the more wheat flour you use, the denser your crumb.
**For this recipe, I used a whole wheat sourdough starter with a 1:1 water ratio. You can use an all-purpose starter for this recipe if you wish. Additionally, if you struggle with shaping your dough, feel free to swap out all-purpose flour for bread flour.
Additional Equipment
If you want to make White ‘N’ Wheat Artisan Sourdough Bread, you’ll need a few items on hand:
- Large Mixing Bowl
- Mixing Spoon
- Dough Cutter
- Banneton Basket
- Parchment Paper
- Dutch Oven
- Wire Cooling Rack
Keep in mind that you can get creative with some of these items. For example, if you don’t have a Dutch oven, you could use a high-heat casserole dish with lid. If you don’t have a Banneton, you could use a bowl lined with a dish cloth. Don’t let your kitchen tools limit your baking experience!
I provide affiliate links as an Amazon associate, and I earn a small commission if you make a qualified purchase. However, I only recommend products I use and enjoy.
Instructions
White ‘N’ Wheat Artisan Sourdough Bread takes quite a bit of time to make. However, the longer times mean a much stronger flavor. Make sure you have plenty of room in your schedule before settling in to make your loaf.
Feed Your Starter- 8:00 AM
As with many sourdough recipes, you’ll want to make sure your starter is bubbly, active, and at its peak. A ripe starter gives your White ‘N’ Wheat Artisan Sourdough Bread the lift it needs to rise in the oven.
In general, my starter tends to peak within 4 to 6 hours after its feeding. Your starter may peak sooner or later depending on how old it is and your current room temperature. I tend to feed my starter first thing in the morning, at about 9:30 AM.
Autolyse – 2:30 PM
An hour before your starter peaks, combine the white and wheat flours with the water in a large container. Stir until well incorporated, cover, and set aside.
This part of the baking process is called the autolyse stage. Autolysing gives the wheat flour more time to soak up the water and soften the bran. The longer you autolyse, the easier your dough will be to work with. However, you can cut the autolyse stage to 30 minutes rather than an hour if needed.
Mix Your Dough – 3:30 PM
Once your dough has rested, add the starter and the salt and mix thoroughly.
Keep in mind that the dough at this stage will be wet and sticky. However, don’t be afraid to get in there with your hands to mix everything together. You may have to wet your hands a few times to keep the dough from sticking too much to your fingers.
Cover your dough and let it sit for 30 minutes to an hour.
Stretch and Fold – 4:00 PM – 5:30 PM
The next stage of baking White ‘N’ Wheat Artisan Sourdough Bread is the stretch and fold technique. This technique strengthens the gluten in your dough and gently works in air. With this technique, you don’t have to knead your bread and you’ll get a more open crumb.
Lightly wet your hands and gently grab one end of your dough. Stretch the dough upward until you meet some resistance.
Then fold the dough over itself.
Repeat this process until all four corners have been stretched and folded. Cover and let the dough relax for 30 minutes.
You’ll need to do three or four sets of stretch and folds, each 30 to 60 minutes apart. If you need an example of timing, I do my first stretch and fold at 4:00 PM, my second at 4:30 PM, and my third at 5:00 PM. If my dough seems especially slack at 5:30 PM, I give it an extra fold.
Keep in mind that you have some flexibility here on the timing. If you you need to do run a quick errand or grab some lunch and don’t quite make it back within the 30 minute mark, just do it whenever you can. I’ve made bread with stretch and folds set an hour apart and they turn out just fine. Just don’t forget to cover you dough after each fold – you don’t want your dough to dry out!
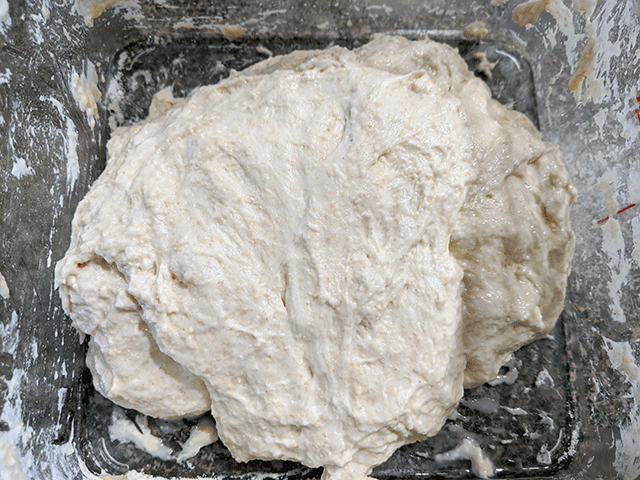
Bulk Fermentation (1st Rise) – 3:30 PM to 9:30 PM
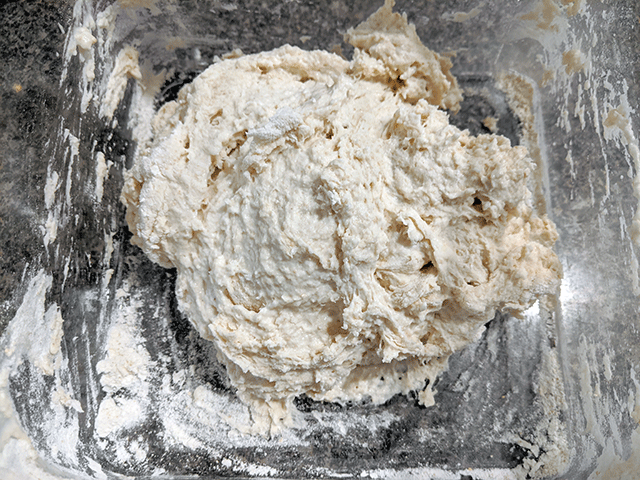
After you’ve finished your stretch and folds, let your dough sit at room temperature until almost doubled in size. This is your bulk fermentation time period, and it can last anywhere from 4 hours to 12 hours depending on your starter, your flour, your room temperature and a variety of other factors.
For me, my loaves turned out best at around the 6 hour mark after mixing, so at about 9:30 PM it was ready to work with. However, I’ve pushed the dough as long 10 hours after mixing, just to see what would happen. Although the longer proofing time meant slacker dough and slightly flatter loaves, they still tasted amazing once baked.
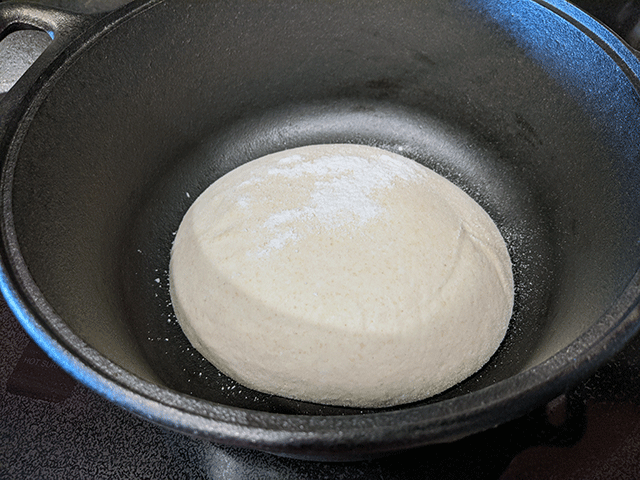
Not sure if your dough has proofed long enough? The dough should have large bubbles on the top and smaller bubbles throughout. The dough should also seem airy compared to your dense, folded dough from hours earlier.
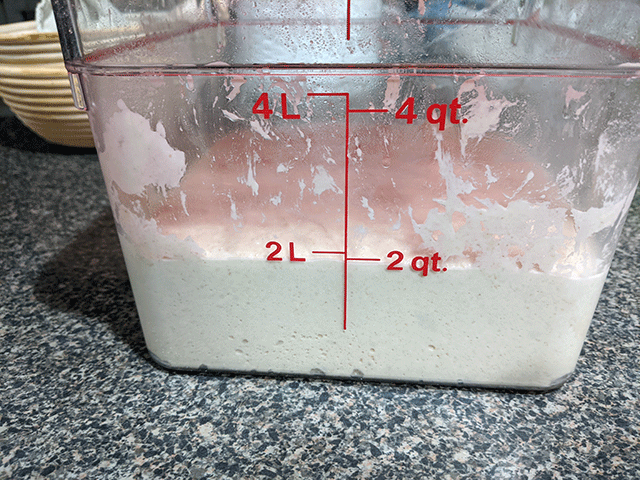
In the picture below, I had doubled the recipe and placed it in a Cambrio container so it was easier for you to see the progress. You can use a large glass bowl instead, though the bowl’s rounded edges may make it difficult for you to estimate just how far along your dough has proofed.
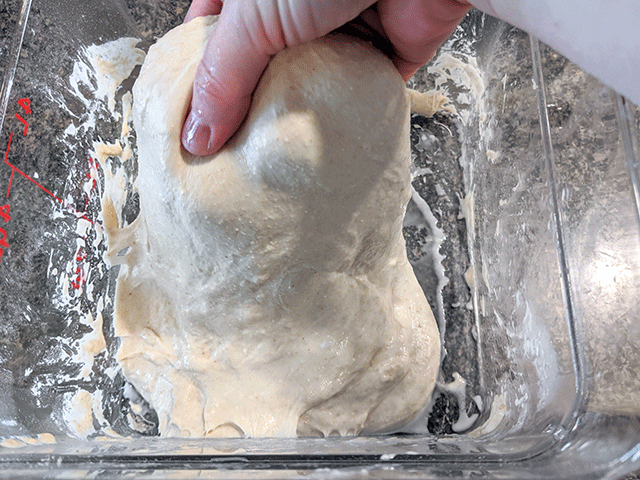
Pre-shape – 9:30 PM
Once your dough has proofed, gently ease it out onto your kitchen counter or table. The dough will still be sticky, but do your best to treat it like a delicate snowflake or broken glass. You don’t want to lose all the air generated during bulk fermentation.
To start, slide your dough chopper under one side of the dough and flip the edge toward the middle of the dough.
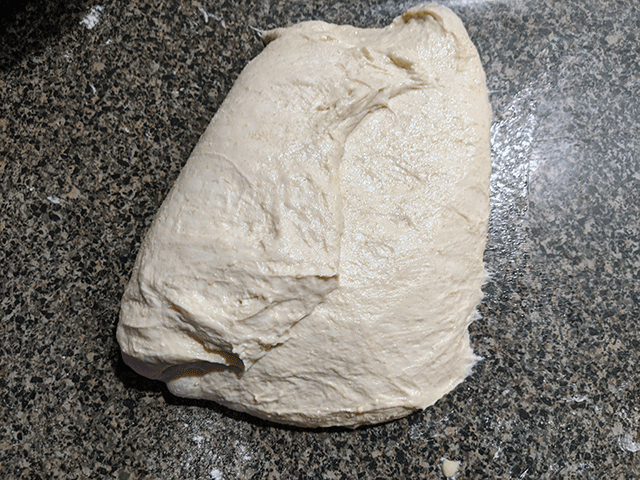
Then slide your dough chopper under the opposite side of the dough and flip it toward the middle.
Next, slide the chopper under the top section of the dough and flip it toward the middle, too.
And finally, slide the chopper under the bottom half of the dough and flip it up toward the middle. With enough practice, you can use this last flip to turn the entire round over in one smooth motion, so the seams are now on the bottom. However, if you are still learning to shape, you can just slide your chopper underneath the dough again and give it a gentle flip.
You should now have the beginnings of your dough round, but you’re not quite done with pre-shaping. Slide your dough chopper under the dough, and gently turn the chopper like you’re turning the steering wheel of a car.
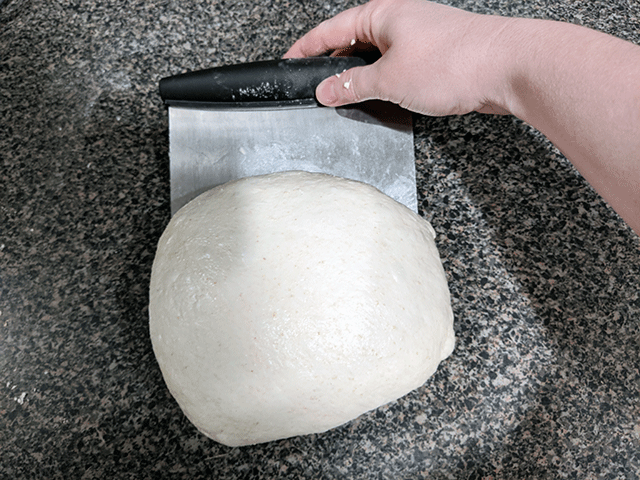
As you slide the chopper, you want to push a little into the dough to build up tension. Repeat sliding and pushing around the edges of the dough until the dough takes a smooth, round shape. Avoid pushing so hard that the outer skin breaks.
Cover your round and let it sit for 15 to 20 minutes. I simply overturn the bowl I used during bulk fermentation to keep my round from drying out.
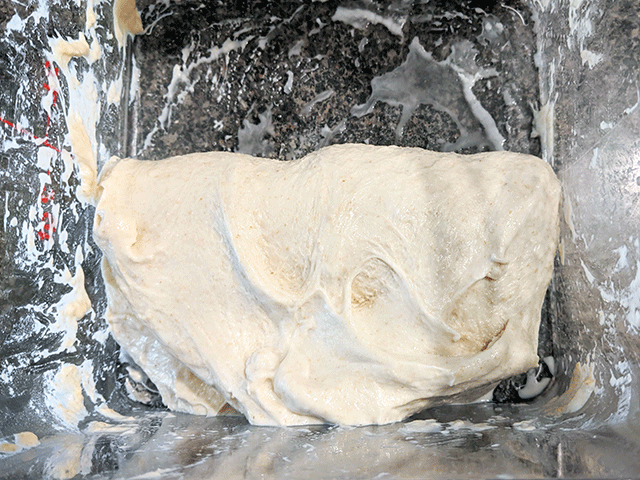
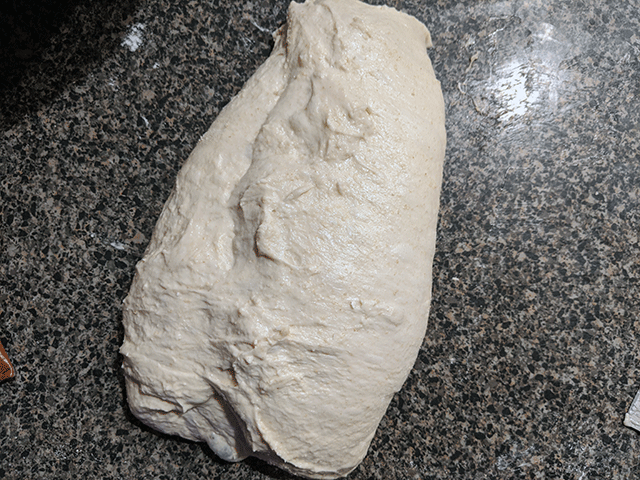
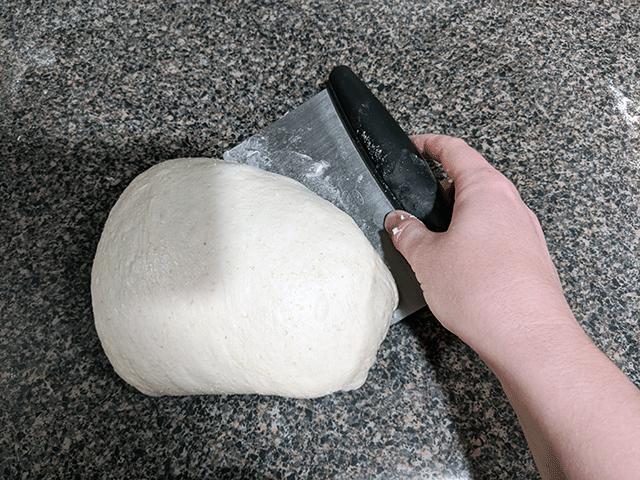
Final Shaping – 10:00 PM
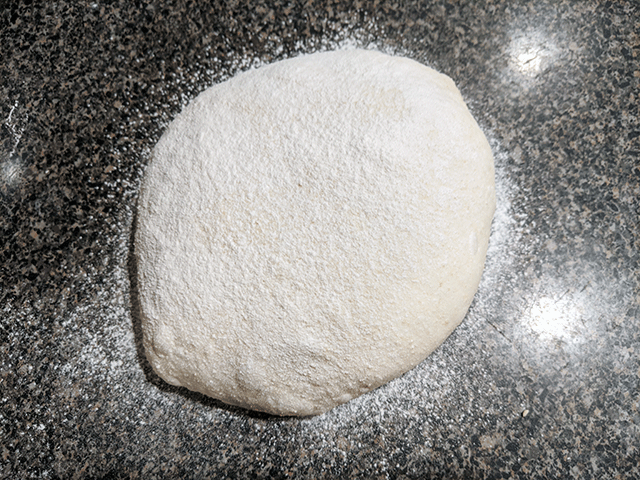
After your dough has had a chance to relax for a while, you’re ready for its final shaping. Uncover your round and lightly dust the top of the round. Just a few sprinkles will do, as excess flour will show up as streaks in your final bake.
Slide your dough chopper under the round and flip the round completely over, so the dusted surface is now on the bottom, and the seams from your previous shaping are on top again.
Remember all the steps from your pre-shaping? Your final shaping follows the same process. Flip one side to the middle, then the other side. Then flip the top to the middle and the bottom.
Use the dough chopper to flip it back over again, so the smooth side is on top and the seams are on the bottom. Then gently slide the chopper under the edge, turn the chopper like a steering wheel while gently pushing in on the dough to build up tension. Repeat around the edges of the dough until you have a tight round.
Feel free to scroll up to the pre-shaping section if you need visuals.
Cold Proof – 10:00 PM to 10:00 AM Following Day
Dust your Banneton basket with flour and use your dough chopper to transfer your round to the basket.
A few notes here: if you don’t want to score your bread at all, feel free to place your round directly in a heavily floured Banneton with the seams facing down. When you bake, the dough will be flipped, and the White ‘N’ Wheat Artisan Sourdough Bread will split along the seams for a more rustic look.
If you like the swirling pattern of the basket and want to follow a simple scoring pattern, place your round directly in a heavily floured Banneton with the seams facing up. The pattern will transfer to the dough and will split wherever your score your dough.
Or if you feel braver and want to do more unique scoring later, place your round in a lined and lightly floured Banneton basket. My basket came with with its own lining, but you can use a towel to achieve the same results.
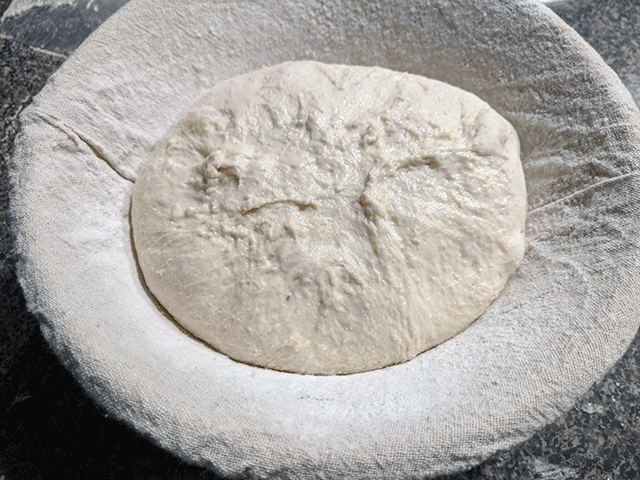
Cover the dough and basket and place in the refrigerator to proof a second time overnight. You can let it proof anywhere from 8 to 18 hours, though I typically keep it in the fridge for about 12 hours for convenience.
The longer your dough stays in the fridge, the more time it has to develop its tangy sourdough flavor. However, you don’t want to wait too long, as overproofing will result in exhausted yeast and flatter loaves.
Preheat and Score- 9:00 AM to 10:00 AM
About an hour before you plan to bake your White ‘N’ Wheat Artisan Sourdough Bread, place your Dutch oven with its lid inside your conventional oven and set the temperature to 450 degrees Fahrenheit (232 degrees Celsius). As Dutch ovens take a while to fully heat, you’ll want to let it sit for at least 45 minutes in your oven.
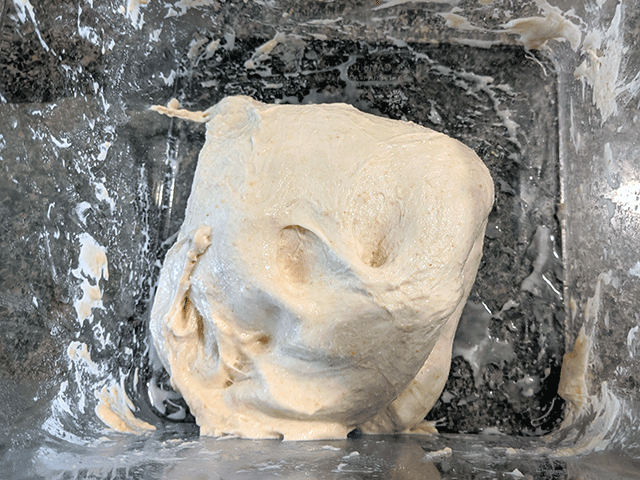
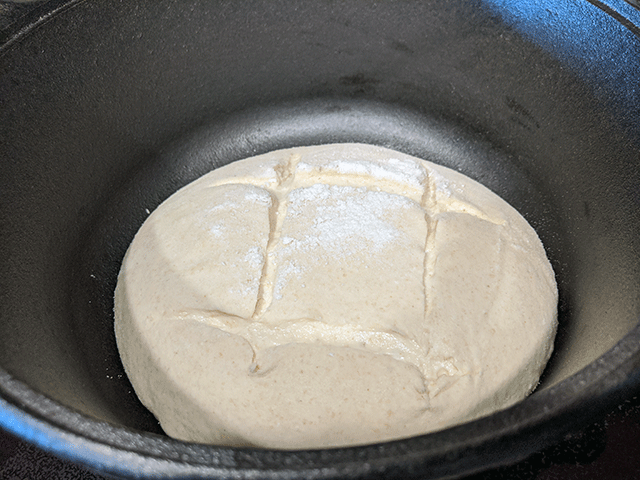
Once your Dutch oven has fully heated, take your dough out of the refrigerator and remove its cover. Your round shouldn’t look much different from the night before, though the seams may have relaxed and smoothed over a little.
Now, depending on how you put your dough in the basket, you’ll need to transfer your dough to your Dutch oven.
Scoring Methods
If you put your dough seam side down – go ahead and gently flip the basket so the dough lands in the Dutch oven. The seams should be facing up now, even if you can’t see them as clearly. Replace the lid of your Dutch oven and go ahead and bake for 30 minutes.
If you put your dough seam side up – go ahead and gently flip the basket so the dough lands in the Dutch oven.
Grab a sharp knife, razor, or bread lame and score your dough quickly and simply. An X or Hashtag score is my go-to if you want a basic pattern that you can do quickly. Replace the lid and bake for 30 minutes.
If you placed your dough in a lined Banneton – lightly dust the top of the dough with flour, cover the top with parchment paper, and then flip the dough out onto the parchment paper. And again, lightly dust the top of the round with more flour, to give the design more contrast.

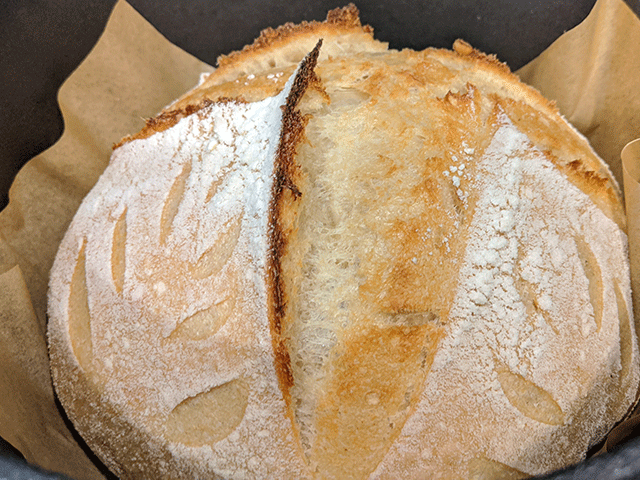
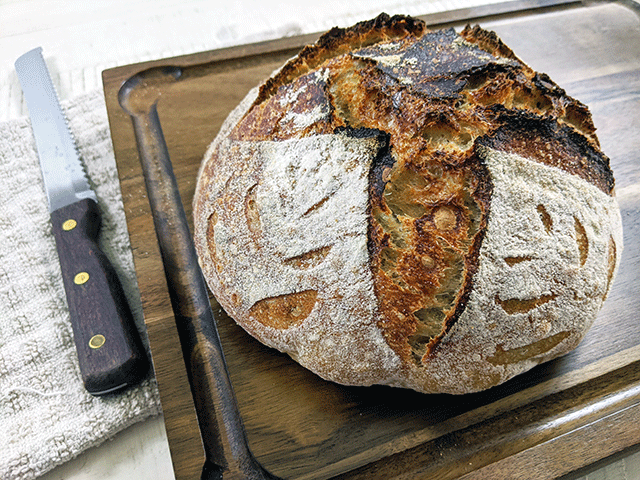
Use a sharp knife, razor, or bread lame to make your score. I’m still learning how to score, but here’s the pattern I used to make the bread in the featured image at the top of my post.
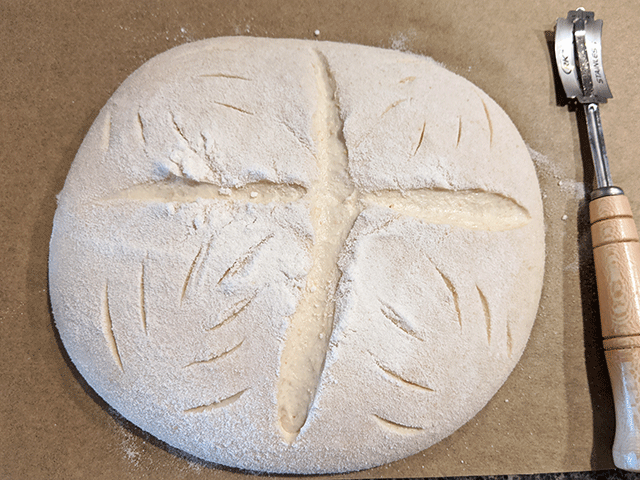
As you score, keep your knife steady and and don’t be afraid to go deep in places that you want it to split. In this case, I wanted the dough to split at the X in middle. Shallow strokes will only widen during baking.
Bake Your Bread – 10:00 to 10:30 AM
When you’re ready, grab the edges of the parchment paper and place your dough into Dutch oven with the parchment paper.
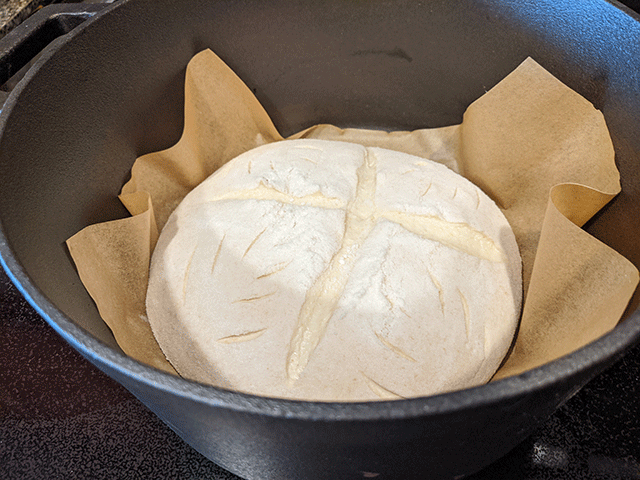
Replace the lid of your Dutch Oven and bake for 30 minutes.
Final Bake and Cool Down – 10:30 AM to 10:45 AM
At this point, it doesn’t matter whether you placed your dough directly in the Dutch oven or with parchment paper. You’ll have baked your bread for 30 minutes at 450 degrees Fahrenheit (232 degrees Celsius) no matter which option you tried.
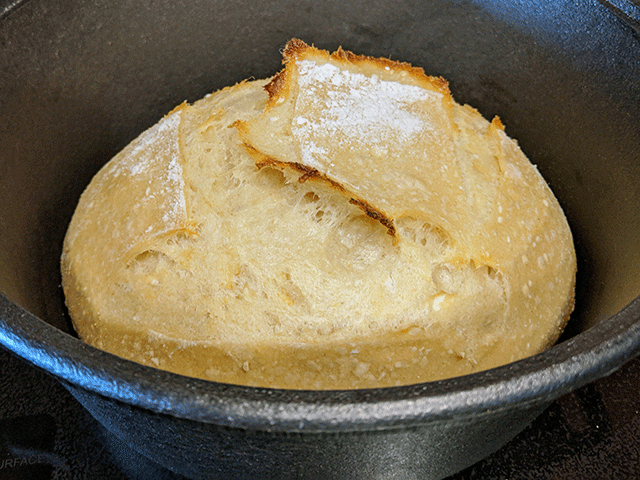
After 30 minutes of baking, remove the lid of your Dutch oven. If you scored a simple hashtag, your White ‘N’ Wheat Artisan Sourdough Bread might look like this right now – with a light golden color.
Similarly, if you used parchment paper and scored a more complicated design, it might look like the picture below when you remove the lid.
But you’re not done yet!
Put your bread back in the oven without its lid and let it bake for another 10 to 15 minutes until it achieves a dark, rich color. This final bake will crisp up your crust and give it a more pronounced flavor. Aim for color that’s just shy of being burnt for best results.
Let Your Bread Cool
Transfer your bread to a wire rack and allow it to cool completely. As it cools, the residual heat trapped within the loaf will finish baking your bread and will give it a deeper flavor and better consistency. Avoid cutting your loaf prematurely, as your White ‘N’ Wheat Artisan Sourdough Bread may turn out a little gummy.
I give my White ‘N’ Wheat Artisan Sourdough Bread at least an hour after baking before I slice and serve it. However, if you prefer a chewier, softer crust rather than a crisper, crackling one, I suggest putting your loaf in a sealed bag after it has finished cooling and let it rest for the remainder of the day. The bag will trap in any moisture, make the bread sweat a little, and soften the crust, and I find that the wheat flavor is stronger the next day as well.
Traditional sourdough like this loaf one has lots of natural acidity, so it has a decent shelf life compared to your typical homemade loaf (though it doesn’t last quite as long as bread made with preservatives). On average, a properly stored white ‘n’ wheat artisan sourdough bread will stay good for 4 to 5 days if kept at room temperature.
Just the Basics
White ‘N’ Wheat Artisan Sourdough Bread
Ingredients
- 350 Grams All-Purpose Flour (3 Cups)
- 50 Grams Whole Wheat Flour (1/2 Cup)
- 300 Grams Warm Water (1 1/3 Cup)
- 100 Grams Sourdough Starter – Fed, Active, Bubbly (1/2 Cup)
- 8 Grams Sea Salt (1 3/4 Teaspoon)
Instructions
- Mix your flour and water and let sit for 1 hour.
- Add starter and salt to mixture and let rest for 30 minutes.
- Stretch and fold 4 times with 30-minute rests between folds.
- Bulk fermentation for 4 hours.
- Pre-shape dough and let rest 30 minutes.
- Shape dough and place in floured banneton.
- Refrigerate overnight.
- Preheat oven to 450° Fahrenheit (232° Celsius) with Dutch Oven inside for 1 hour.
- Turn dough onto parchment paper and score.
- Transfer dough to Dutch oven with lid. Bake for 30 minutes.
- Remove lid and continue to bake for another 15 minutes.
- Turn out onto wire rack and allow it to cool completely before slicing and serving.
Notes
Secrets to Success
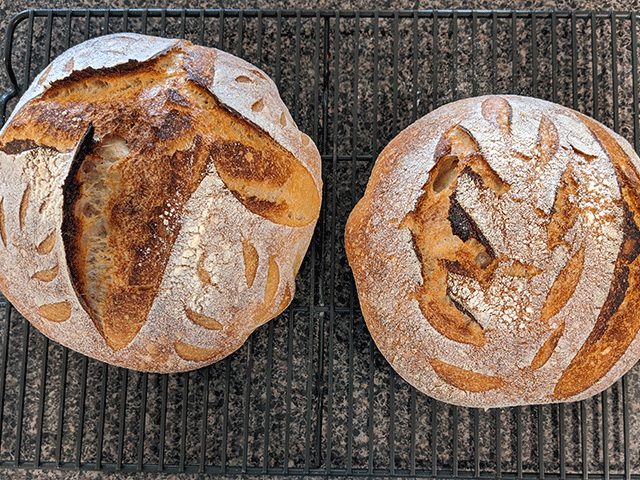
Alright, so White ‘N’ Wheat Artisan Sourdough Bread has a learning curve, and it’s one that I still struggle to master. Even these pretty loaves have a few flaws if you look close enough.
For example, if you look at the bottom of my loaf, you can see a few lumps and indents. That typically happens when the parchment paper presses into your loaf as it bakes. Cutting the parchment paper down to size can help alleviate this, though it may make transferring your dough to your Dutch oven more difficult.
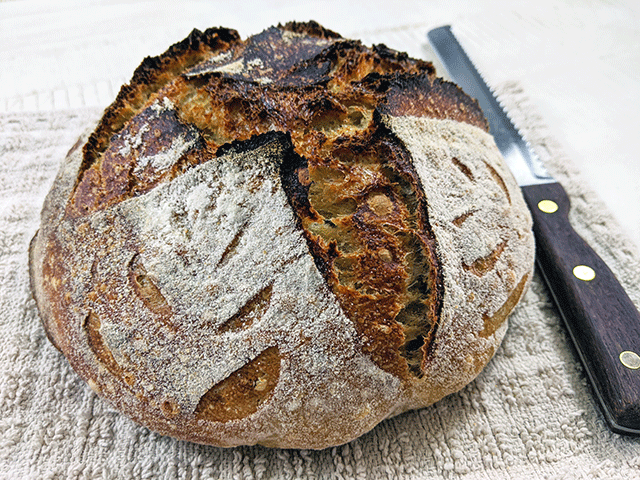
Additionally, lumps (as well as streaks of flour in the loaf) can form from improper pre-shaping and shaping, which is something I struggle with, and it’s only something you can improve with lots of practice. I’ve watched lots of tutorial videos on shaping bread and it seems like the techniques vary from baker to baker, so do what works for you.
Furthermore, don’t second guess your scoring technique. In the pictured loaf, I double backed on my deep center cuts, hoping to go just a little bit deeper. But rather than getting an even split down the middle of my bread and getting the telltale ear of a beautiful loaf, I got a jagged split that looks more like the sides of a volcano.
Scoring takes a lot of practice, and that only comes if you make a lot of bread and have a lot of fun with it. Feel free to keep things simple if that makes you more comfortable – a single, deep, and slightly angled slash down the center of your bread is all you need for a beautiful loaf.
Nutritional Information
White ‘N’ Wheat Artisan Sourdough Bread has very few ingredients, so you don’t have to worry about extra calories from sugar or butter.
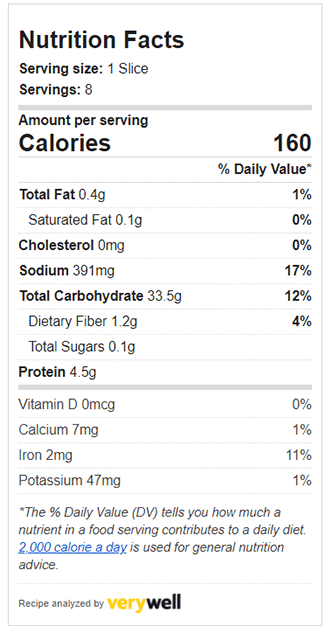
Keep in mind that these rounded boules will vary in size and shape depending on how you cut your loaf. On average, I managed about 8 slices per loaf, and the slices ranged from small to big. Your nutritional information will vary depending accordingly.
Did You Try It?
I know this recipe may seem intimidating at first, but White ‘N’ Wheat Artisan Sourdough Bread is a delicious recipe to try and definitely one of my favorites. The wheat flour lends the perfect amount of flavor without making the dough too difficult to work with.
I hope you try it and have as much fun as I did. Let me know about your experience in the comments below, and feel free to add your own suggestions.


I tried a different recipe for my first loaf, major fail. I then tried this one and it has been fairly easy to follow. I’m making my fourth loaf tonight and added cheese and jalapeños. Fingers crossed it turns out!! I love this recipe!! Thank you!!!
Yay! I’m so happy my recipe worked for you. Thanks for the kind words and positive feedback.