In a rush? You can skip straight to the Pain de Campagne Recipe at my Tumblr or you can jump to my Just the Basics section.
For a long time, I’ve wanted to try making Pain de Campagne, aka French sourdough. The complex flavor and soft and chewy texture make me feel like I’m eating at a bakery in the French countryside.
But up until now, I’ve been a bit intimidated by it.
True artisan sourdough bread recipes require a lot of time and a lot of patience – and I don’t typically have much of either.
But this week I decided to buckle down and tackle this recipe. I thought to myself, if I can make no-knead artisan-style sourdough bread in a weekend, then how much different can it be?
I’m so happy I did.
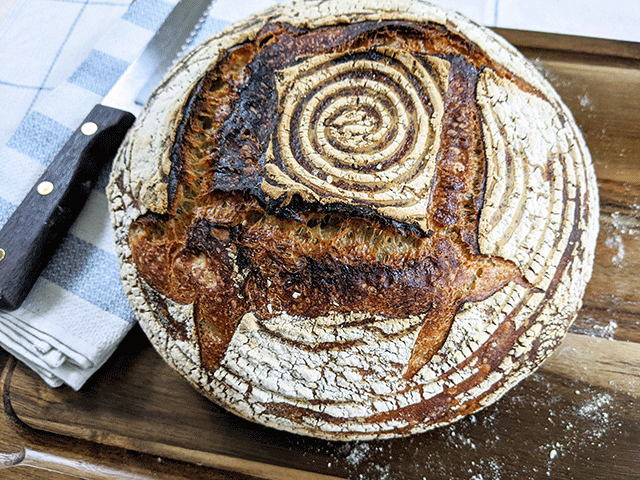
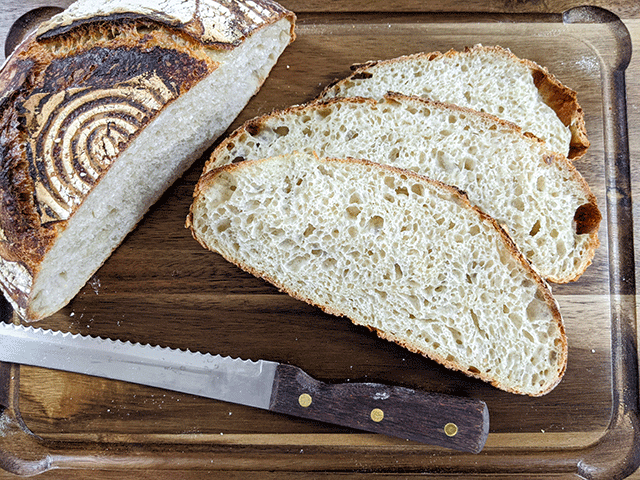
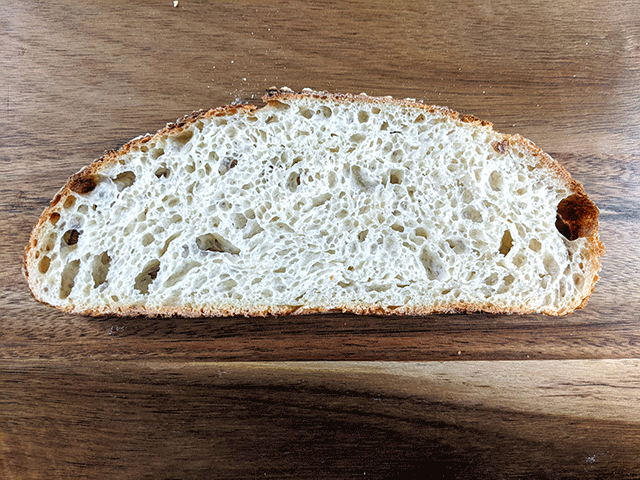
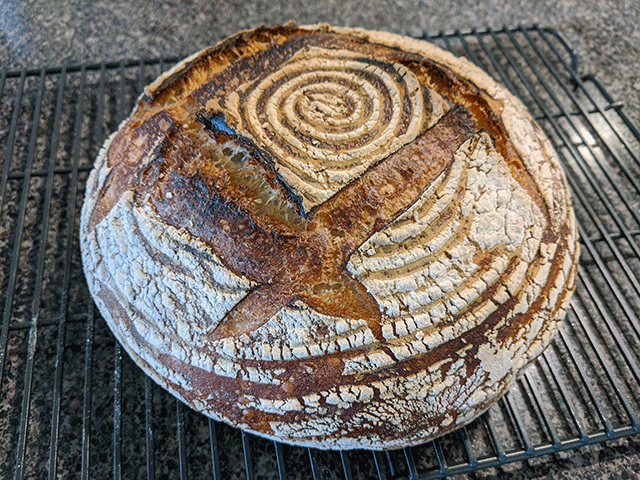
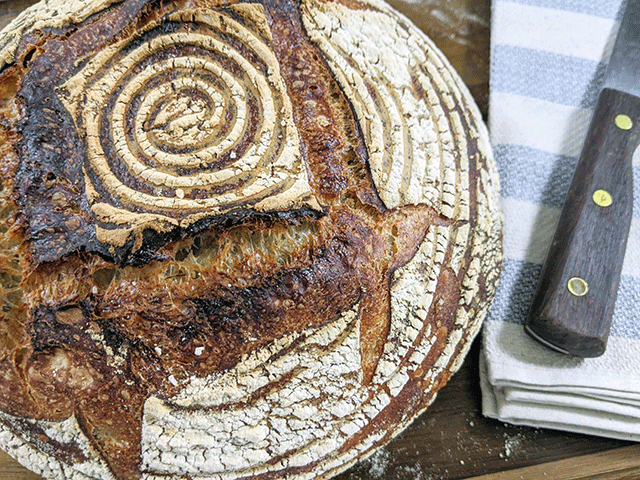
Just look at that slice! Pain de Campagne was perfect on its own as well as part of a beautiful BLT sandwich.
Although Pain de Campagne does take some practice to perfect, it isn’t impossible if you have the right tools on hand.
Time
Prep time: 30 to 35 minutes
Rise time: 8 hours to 24 hours
Cook time: 50 minutes
Total time: Approximately 9 hours 20 minutes to 25 hours 20 minutes
Ingredients
Pain de Campagne involves a combination of white and wheat flours:
- 623 Grams (2 3/4 Cups) Water
- 737 Grams (5 3/4 Cups) All-Purpose Flour *
- 56 Grams (1/2 Cup) Whole Wheat Flour*
- 340 Grams (1 1/3 Cup) Sourdough Starter
- 18 Grams (1 Tablespoon) Salt
*You could use bread flour instead of all-purpose and rye flour instead of whole wheat.
Optional Ingredients
Pain de Campagne mixes well with additional ingredients for added authenticity:
- 1/4 Ounce (1 Tablespoon) Amaranth
- 2 Cups Grated Cheese
- 2 Cups Walnuts
- 1 Cup Caramelized Onions
- 1 Cup Kalamata Olives
- 1/4 Cup Mixed Herbs (Basil, Parsley, and Oregano)
- 1 Tablespoon Diced Garlic
Feel free to mix and match to find the perfect flavor for you – though you probably shouldn’t use all of these optional ingredients at the same time.
Additional Equipment
This artisan-style bread requires a few basic tools to make:
- Measuring Cups and Spoons
- Large Mixing Bowl
- Kitchen Scale
- Dough Chopper/Scraper
- Banneton Baskets
- Two Dutch Ovens
- Bread Lame
- Wire Cooling Rack
Keep in mind that you don’t have to have everything to make this bread. If you don’t have a kitchen scale, I’ve provided alternative measurements. If you don’t have a dough scraper, you can use a large knife. Similarly, if you don’t have Banneton baskets, you can let your dough rise in a bowl, and if you don’t have a bread lame, you can use a sharp razor or knife.
If you do decide to purchase from the affiliate links above, thank you. I receive a small commission as an Amazon associate, and that commission helps keep my site running.
Instructions
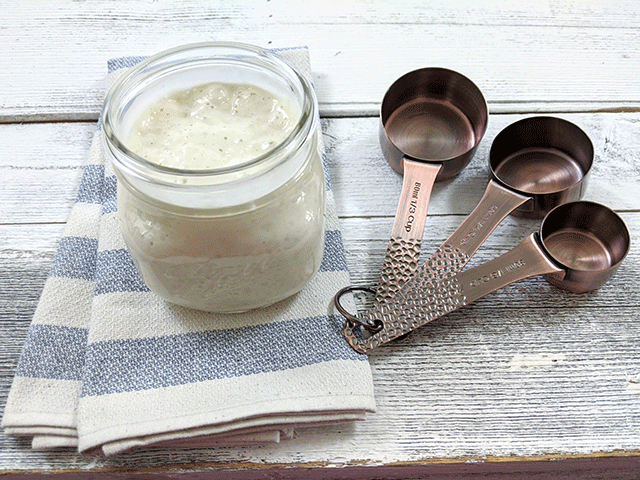
Before we begin, make sure your sourdough starter is active. It should bubble and rise consistently on a schedule, and you should have a feel for when it’s at peak performance. My sourdough starter was more than two months old when I first tried the recipe.
If you don’t think you don’t think your starter is quite ready, I suggest trying a different recipe altogether, such as sourdough discard bread or beginner sourdough sandwich bread. These recipes use a little bit of commercial dry active yeast to help the bread rise, so you don’t have to rely on timing as much.
Feed your starter before you start baking, ideally 4 to 6 hours beforehand so your starter is at its peak.
Mix Your Dough
Once your starter is ready, combine the flours and set aside. Warm your water to about 90 to 95 degrees Fahrenheit (32 to 35 degrees Celsius) – or if you don’t have a thermometer, the water should feel lukewarm but not hot.
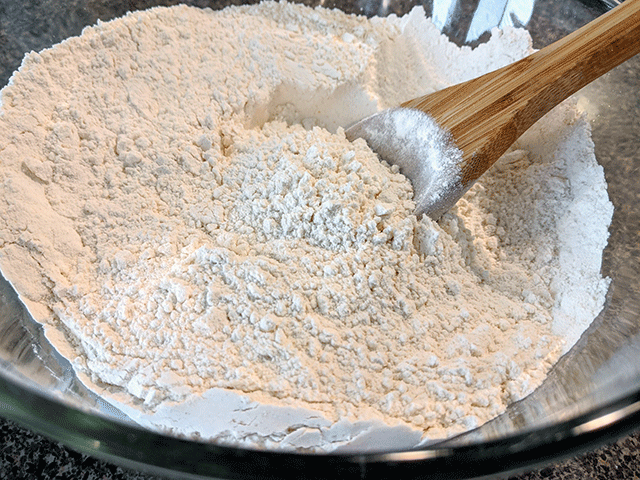
Next, combine the flour and warm water and let it sit for 15 to 30 minutes. You could potentially let it sit for up to an hour if you aren’t in a rush. This process is called autolysing and it helps soften the bran in the wheat, resulting in better gluten development later.
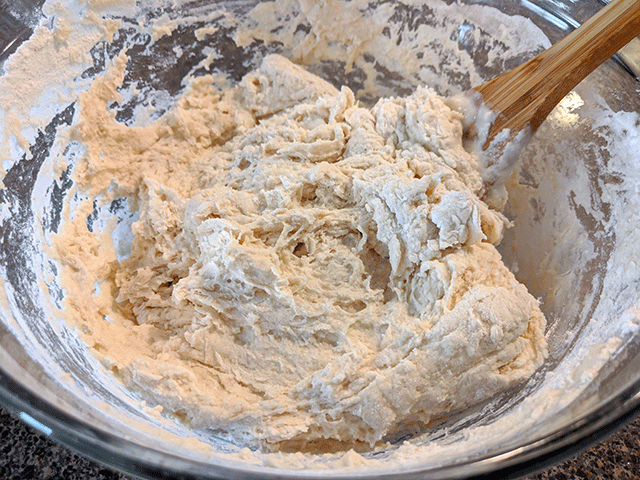
Now add the sourdough starter and the salt to your flour and water and mix thoroughly. The dough will be sticky, so feel free to mix with your hands as needed.
After mixing, your dough will be super slack and goopy and that’s perfect. If you have additional ingredients (such as nuts or cheese or herbs), sprinkle them on top of your dough now. They will mix in naturally during the folding process that happens next.
Let your dough sit for 30 minutes to an hour.
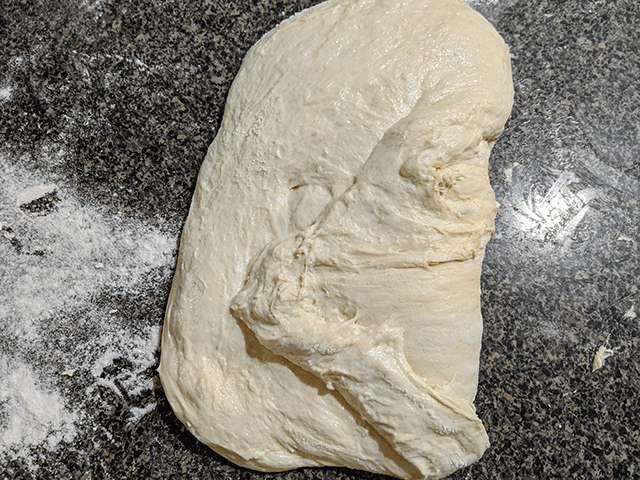
Stretch and Fold
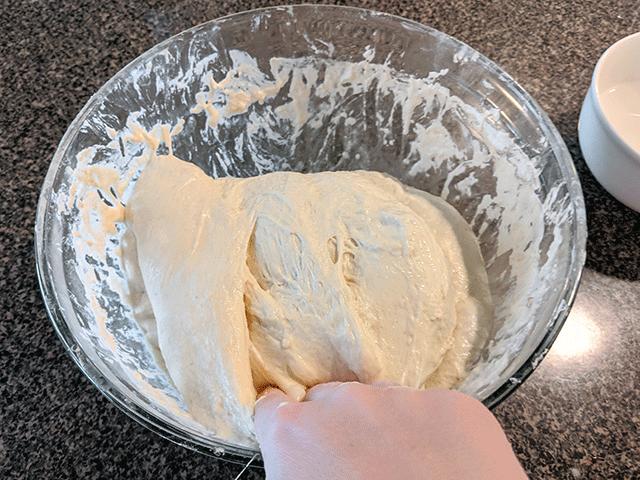
Now comes the messy part. Because the dough is slack, we want to build up some tension and encourage gluten development. So we’ll want to stretch and fold the dough.
Scoop up a big handful of dough and stretch it up until you feel tension. Don’t break your dough if you can help it.
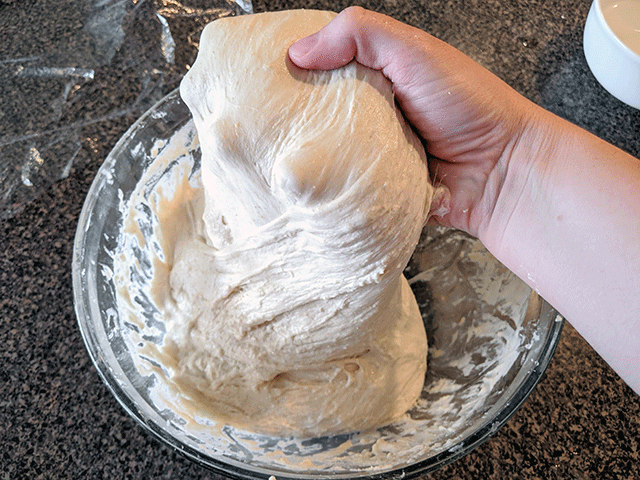
Then fold the dough over itself.
Congratulations! You’ve successfully folded one edge of your dough.
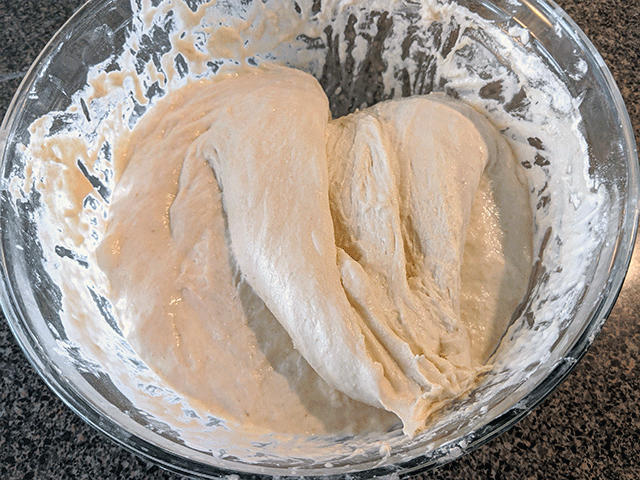
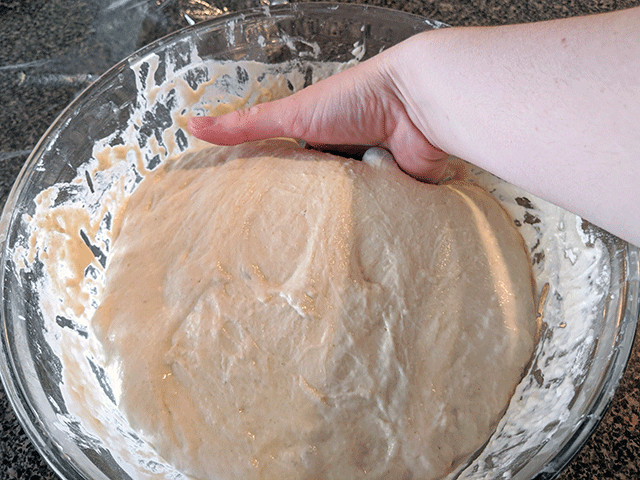
Turn the dough 90 degrees and repeat the process until you’ve folded all four edges of your dough. Then, cover your dough and have it rest for another 30 to 60 minutes until the dough goes slack again.
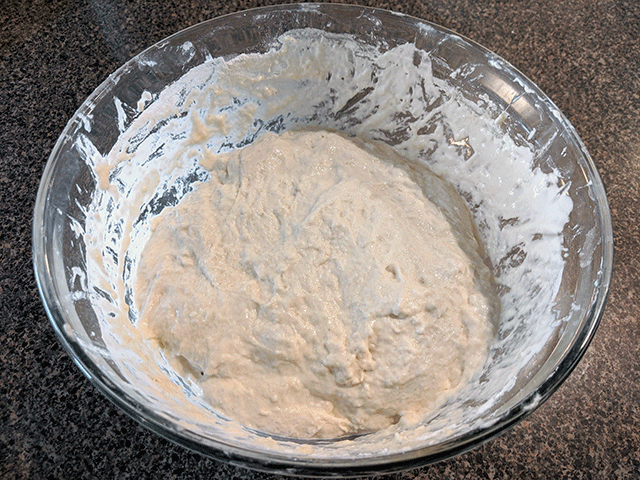
Repeat your stretching and folding and resting about 3 to 4 times. Cover and let your dough rise until it has doubled in bulk, approximately 6 to 8 hours after your initial mixing.
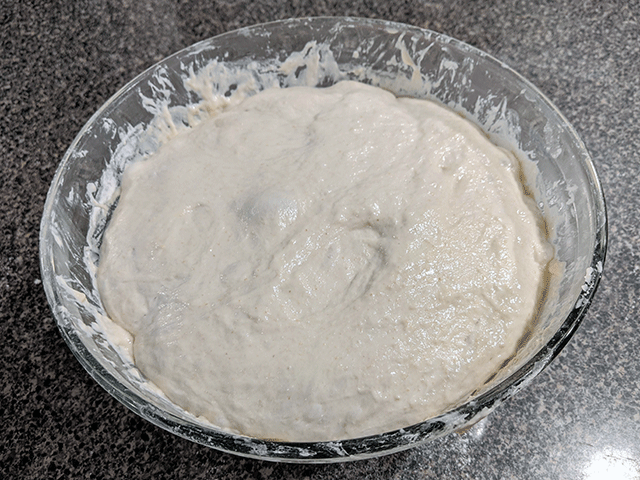
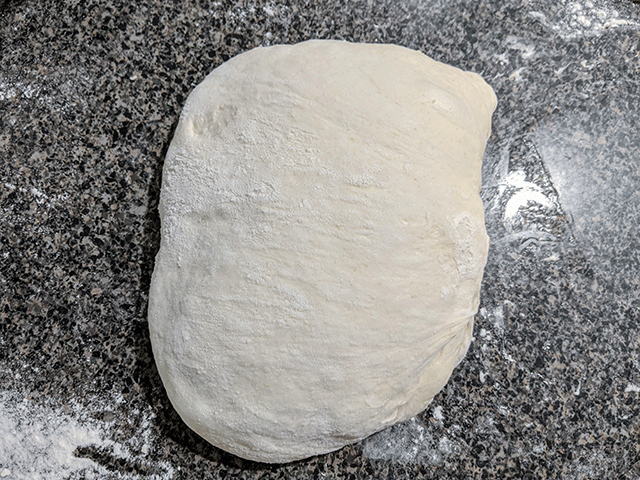
Alright, your dough should have some good air bubbles inside and should still be wet, slack, and goopy. If you move the bowl, the dough should jiggle a little. It’s ready for dividing and shaping.
Divide and Shape
Turn your dough out onto a clean surface, and be careful not to jostle or degas your dough too much. You want to trap as much air in there as you can.
Use a dough chopper or sharp knife to divide the dough into two sections. If you want each loaf to be the same size, you can weigh it. In my case, however, I have one larger and one smaller Dutch oven, so I tend to make one loaf bigger than the other so they cook better.
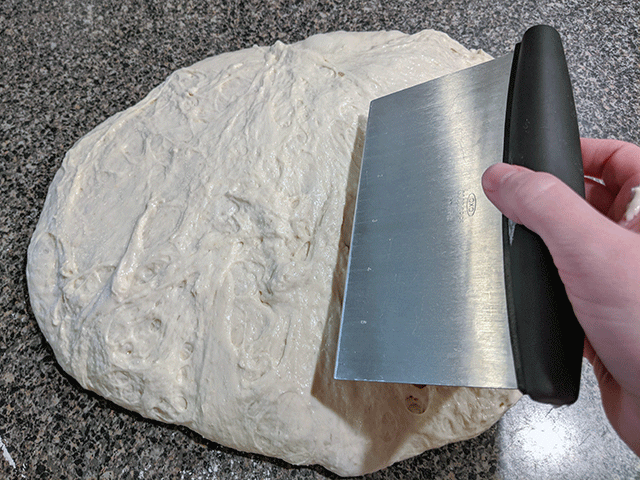
This next bit is a little tricky, even if you have a pastry cutter or dough chopper. But with some practice and patience, you’ll get it.
Lightly flour the top of your dough and the top of the pastry cutter. Gently slide the cutter under the outer edge of the dough.
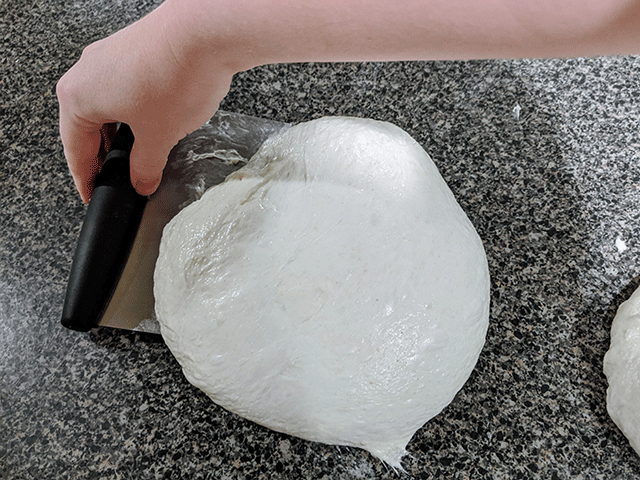
Then rotate the cutter in the same way you might turn a steering wheel. Keep pulling and sliding around the edges until you’ve formed a loose circle.
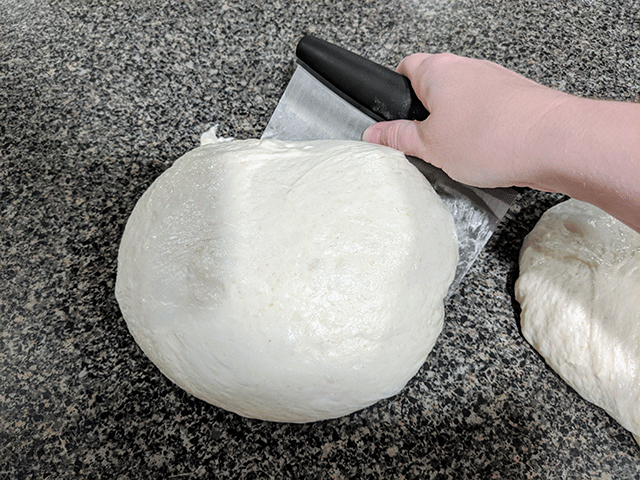
Repeat this shaping process on the other round of dough and let both rest for 30 minutes.
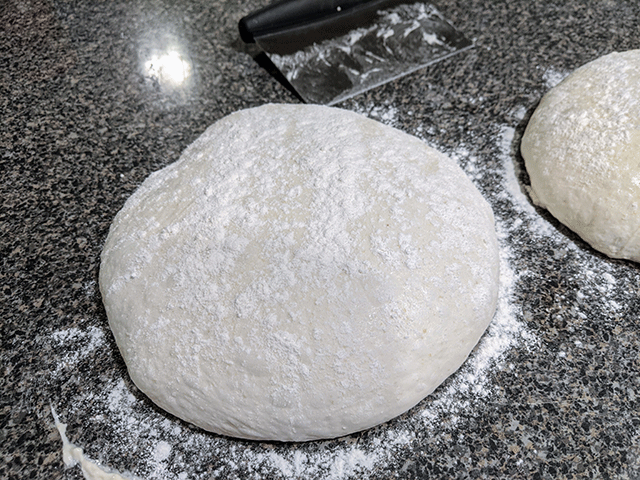
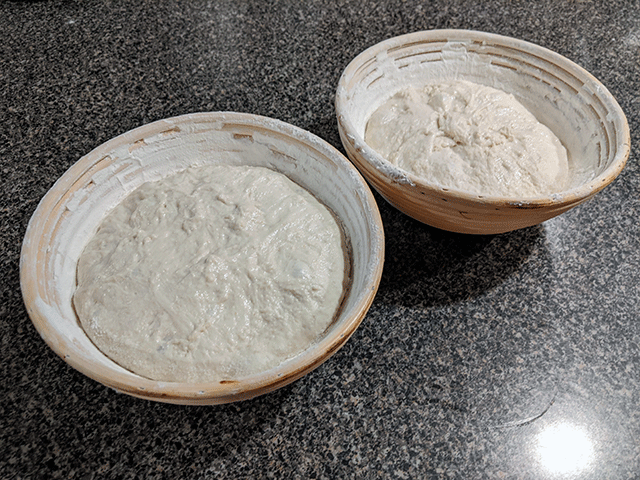
While your dough rests, prepare your proofing baskets. Generously flour the Bannetons, rubbing the flour into all the lines and creases. The flour keeps your dough from sticking to the baskets, so don’t worry about using too much.
When your baskets and dough are ready, you can move onto your final shaping.
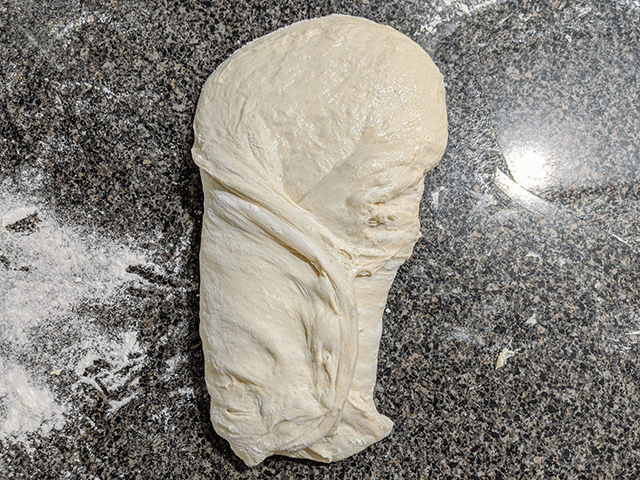
Final Shape
Lightly flour your pastry cutter and slide it under one of the dough rounds. Flip the dough over and spread the dough gently. Pull the bottom two sides away from each other to form little wing shapes.
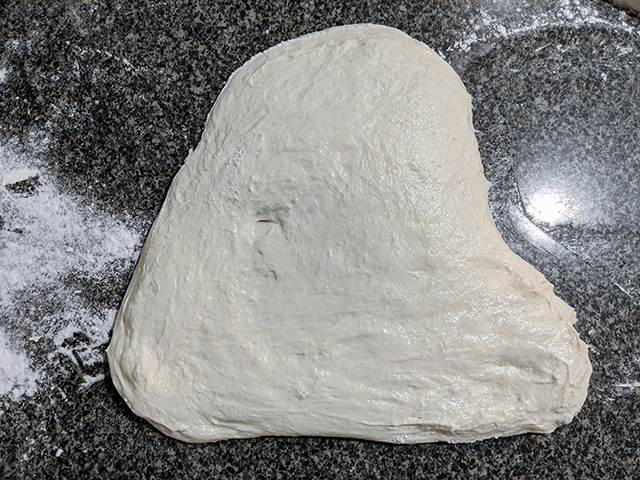
Next, fold the right wing to the middle of the dough.
Then fold the left wing over the right. It should loosely resemble an envelope or maybe a mummy sleeping bag at this point.
Gently grab the top of the envelope and stretch it up a little, then fold it down to the middle.
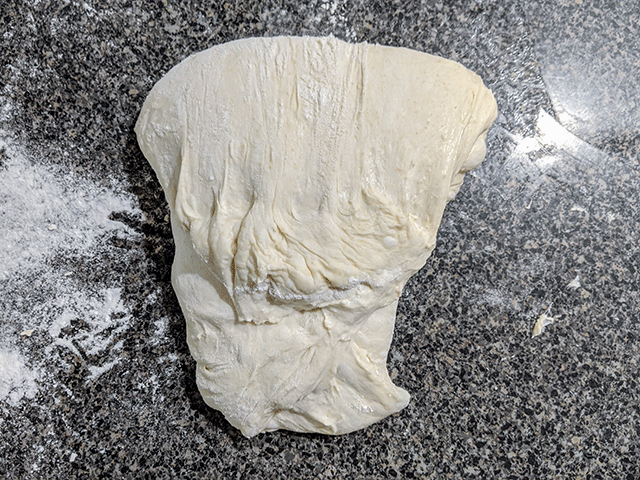
Then, grab the bottom of the envelope and stretch it down a little and then fold it up to the top. At this stage, dough that was stuck on the bottom of your counter is now on the top.
Use both hands to gently cup your round. Slowly tuck the edges of the dough with your hands while dragging the dough toward you. You want to create tension on the outside of the dough without breaking the outer skin.
After each slide and drag, rotate the dough and repeat until your dough forms a smooth, uniform ball.
Ferment in the Fridge
Use your dough chopper to slide under the round and flip the dough into the proofing basket, seam side up. If you feel satisfied with your dough shape, cover the baskets tightly and place in the fridge to rise overnight.
If your dough ball still seems a little slack, despite your shaping, let the dough rest for 5 to 10 minutes. You can clean up your counter while it rests.
When you’re ready, lightly flour your hands (or wet them) to keep the dough from sticking to your fingers. Grab four of your outside edges of your dough and fold them up to the middle, creating a little package or envelope again. Then pinch the seams together to give it some extra tension.
Once you’ve finished, go ahead and cover your baskets tightly and let them rise in the fridge overnight.

Score and Bake
Before you are ready to bake, put your two Dutch ovens into your oven and preheat to 450 degrees Fahrenheit (232 degrees Celsius). The lids of your Dutch ovens should be on and you’ll want to preheat for at least 45 minutes to an hour.
Once everything is preheated, transfer your dough to the Dutch oven.
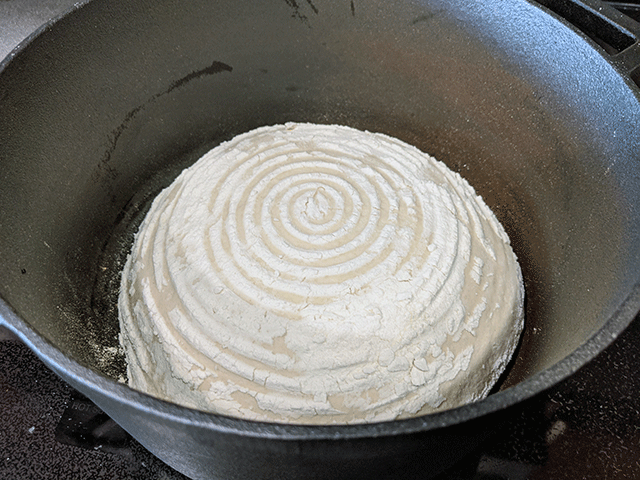
Score your loaf with a sharp knife or bread lame. Careful! The Dutch oven will be hot and it’s easy to burn a wrist or a finger during the scoring process.
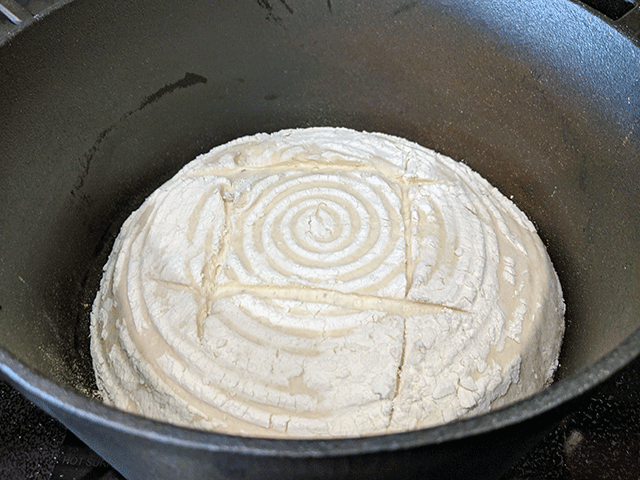
Replace the lid on your Dutch oven and put it into the oven. Do the same with your second loaf and bake for 30 minutes.
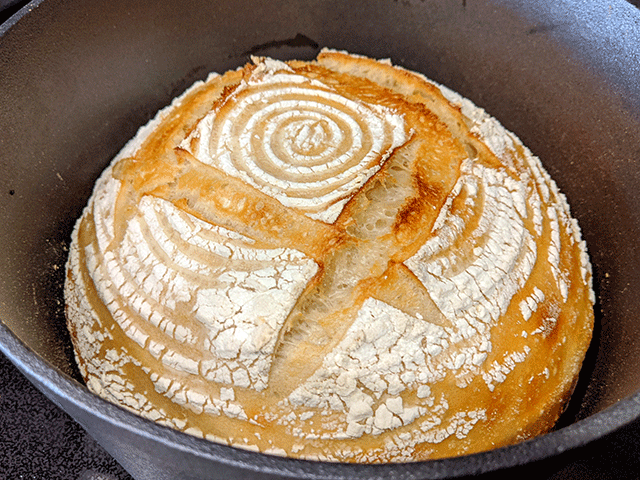
Remove the lid and bake for an additional 15 to 20 minutes. The crust will turn from a light golden color to a richer darker brown.
Let Your Bread Cool
After baking, turn out your loaves onto a wire rack and allow it to cool completely.
Although the crackling sound and yeasty smell of your bread may be tempting, resist the urge to cut into your loaf prematurely. Even though your bread is no longer in the oven, your bread hasn’t finished baking. The residual heat will ensure your bread cooks all the way through.
If you cut too early, your pain de campagne may come out gummy.
Once everything has cooled, feel free to slice into your bread and enjoy.
Although my family thoroughly enjoyed Pain de Campagne smothered in butter, you can up the authenticity by pairing it with a French cheese such as Brie or Gruyere.
Just the Basics
Pain de Campagne
Ingredients
- 623 Grams Warm Water (2 3/4 Cup)
- 737 Grams All-Purpose Flour (5 3/4 Cup)
- 56 Grams Whole Wheat Flour (1/2 Cup)
- 340 Grams Sourdough Starter (1 1/3 Cup)
- 18 Grams Salt (1 Tablespoon)
Instructions
Autolyse and Mix
- Feed your starter before you start baking, ideally 4 to 6 hours beforehand so your starter is at its peak.
- Combine the flours and set aside.
- Warm your water to about 90° to 95° Fahrenheit (32° to 35° Celsius).
- Combine the flour and warm water and let it sit for 15 to 30 minutes.
- Add the sourdough starter and the salt to your flour and water and mix thoroughly. Let your dough sit for 30 minutes to an hour.
Stretch and Fold and Proof
- Stretch and fold the dough. Let rest 30 minutes. Repeat for a total of 4 times with 30 minutes between each stretch and fold.
- Cover and let your dough rise until it has doubled in bulk, approximately 6 to 8 hours after your initial mixing.
- Turn your dough out onto a clean surface, and use a dough chopper or sharp knife to divide the dough into two sections.
- Pre-shape each dough section into a round. Let rest for 15 to 20 minutes.
- Shape your dough and transfer to a floured banneton. Cover and place in the refrigerator overnight.
Bake
- Put your two Dutch ovens into your oven and preheat to 450° Fahrenheit (232° Celsius) for 45 minutes to an hour.
- Carefully, transfer your dough to the Dutch oven.
- Score your loaf with a sharp knife or bread lame.
- Replace the lid on your Dutch oven and put it into the oven. Do the same with your second loaf and bake for 30 minutes.
- Remove the lid and bake for an additional 15 to 20 minutes. The crust will turn from a light golden color to a richer darker brown.
- Turn out your loaves onto a wire rack and allow it to cool completely.
Notes
Secrets to Success
Alright, I’m going to admit it right here – Pain de Campagne is TOUGH to make if you don’t know what you are doing. I’ve practiced with a few different bread baking techniques, and I struggled to work with this dough.
Here’s what my first attempt looked like:
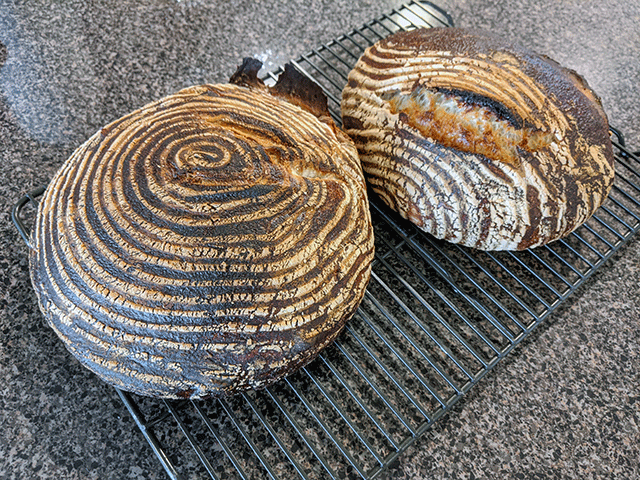
Yeah, I call these twins “burnt” and “botched.” Here’s what I learned from this first mess.
Use a Mature Starter
If your starter can’t raise itself, you can’t expect it to raise bread. My starter was fairly active when I made it, but I used unfed starter rather than fed because I figured the dough would feed it. It didn’t rise as well as I thought it would.
Move Quickly With the Dough Chopper
Use your dough chopper rather than your hands to shape the dough. This is a high hydration bread, and it will stick to your hands like no other, even if you are liberal with the flour. Although some dough will still stick to the chopper, it won’t stick as badly.
Do not break the outermost layer of your dough when shaping. Your dough should look like a smooth tight ball with some tension. If you break that tension, your bread won’t have any support and it will fall flat during baking.
Prepare Your Proofing Baskets
Be liberal with the flour when lining your proofing baskets. If regular flour still doesn’t cut it, try rice flour instead. The first two times I made this bread, my dough stuck to the Banneton. When I tried to put it in the Dutch oven, it came out in a globby mess. As a result, I lost a lot of the gas that I had trapped in the dough during the overnight rise.
If you want to score your bread, make sure the seams face up in your proofing baskets. With the seams facing down, they’ll end up on the top of your bread when you put them in the Dutch oven. The seams will create natural splits along the seams rather than following your scoring patterns.
Score Carefully and Confidently
When scoring your bread, don’t be afraid to go deep. I tend to panic when scoring because I don’t want to burn myself on a hot Dutch oven, and as a result, my scoring doesn’t look great and the bread doesn’t spring up as well as it should. If you worry about burning your hands, I suggest getting some oven-safe gloves rather than using traditional oven mitts.
However, don’t let this bread intimidate you into not making it. My first two loaves may have looked kind of sad, but my next batch of Pain de Campagne tasted phenomenal. Presentation takes practice and patience. But the flavor still tops anything I would have purchased on the grocery store shelf.
Nutritional Information
With so few ingredients in Pain de Campagne, the nutritional information is pretty straightforward:
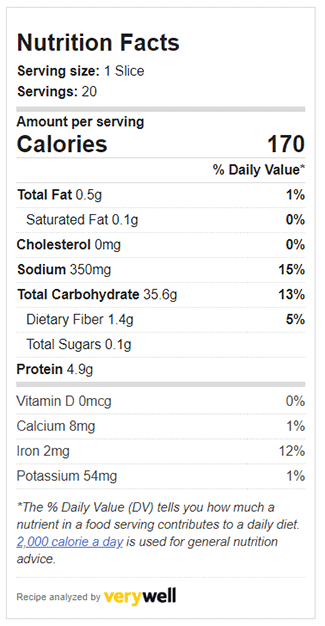
Keep in mind that these are round boules, so slices (and consequently calories) will vary. Additionally, you’ll need to account for any additional ingredients (such as nuts or cheese) you put in your dough.
Did You Try It?
I love trying new things, even if it takes me a long time to get the hang of them. I’m so happy that I tried this pain de campagne recipe. Did you try it, too? How did your loaves turn out?
Let me know about your experiences below. Feel free to share any tips and secrets you have as well.