
In a rush? You can skip to the Sourdough Discard Bread recipe at my Tumblr or you can skip to my Just the Basics section!
So how goes your sourdough starter? Is it alive and bubbling? Have you named it something creative? Have you discovered exactly how many hours it takes your starter to reach its peak after feeding?
Yeah, I’m not to that point yet.
Even though I’ve tried quite a few sourdough recipes, I’m still learning the ins and outs of making and tending a sourdough starter. Although my starter has a few good bubbles, it lacks both a name and the ability to make bread rise on its own consistently.
Fortunately, I found a recipe that I can make even when my starter is cold and inert. My sourdough discard bread takes all the guesswork out of starters and lets you enjoy artisan-style bread with minimal work.
I particularly love this recipe because it minimizes waste, too! You don’t have to throw your sourdough discard in the trash before feedings. Instead, you can mix it with some yeast, water, flour, and boom! Beautiful bread that you can brag to your friends and family about.
Sourdough discard bread is tasty and versatile. It’s slightly tangy because of the sourdough starter, but the tang is faint enough that you can pair it with a variety of flavors. Want to make a peanut butter and jelly sandwich? Perfect. Need something to dip in clam chowder? You got it.
Time
Prep time: 15-20 minutes
Rise time: 3 to 4 hours
Cook time: 40 to 45 minutes
Total time: Approximately 3 Hours 55 minutes to 4 hours 35 minutes
Ingredients
Here’s what you need to make sourdough discard bread:
- 240 Grams (1 Cup) Warm Water
- 4 Grams (1 1/4 Teaspoons) Dry Active Yeast
- 227 Grams (1 Cup) Sourdough Starter Discard
- 9 Grams (1 1/2 Teaspoons) Salt
- 8 Grams (2 Teaspoons) White Granulated Sugar
- 300 Grams (2 1/2 Cups) All-Purpose Flour*
*If you want to make this recipe with bread flour, you can! The original recipe I found recommended using the same amount of bread flour and instant yeast as listed above.
Keep in mind that you’ll want additional flour for sprinkling and you may need to adjust your total flour depending on the consistency of your starter. My all-purpose flour starter follows a 1:1 ratio of flour to water. However, I’ve tried this recipe with a whole wheat starter, and I needed a lot more flour to get the consistency I wanted, almost a whole cup.
Additional Equipment
You’ll need a few kitchen basics to make sourdough discard bread:
- Standing Mixer*
- Measuring Cups and Spoons
- Banneton Proofing Basket**
- Dutch Oven
- Bread Lame***
- Cooling Rack
*You can make this recipe without a standing mixer. I find it faster and easier to use a mixer with this recipe, but if you want to knead it by hand, you can!
**Don’t have a proofing basket? No problem! You can let your dough rise in a bowl lined with a floured tea towel.
*** A sharp knife works too. It has to be sharp though. You want to slice the dough with it, not tear the dough.
Instructions
Sourdough discard bread is a great recipe for beginners. The hardest part of making this loaf is waiting in between steps. But this bread is definitely worth the wait.
Mix Your Dough
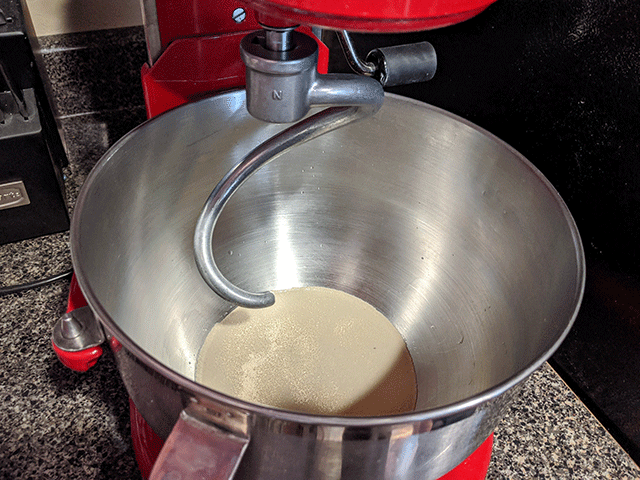
Start by combining the yeast and the warm water in a large bowl. It can be the bowl of your standing mixer, or it can be a mixing bowl if you plan to knead your dough by hand.
Stir the yeast until it dissolves and then let it sit for 10 to 15 minutes. This wait allows your yeast to activate and help your bread rise.
If you want to skip the wait time, swap your dry active yeast for the same amount of instant yeast. You can mix instant yeast right in with the rest of your ingredients and it’ll still do its job.
Once your yeast looks a little puffy and bubbly in the water, you’re ready for the next step. Add your sourdough discard and stir until everything dissolves.
At this point, I like to take a break and let the starter and the yeast sit for another 10 to 15 minutes. This gives your starter some time to settle and play nice with the yeast.
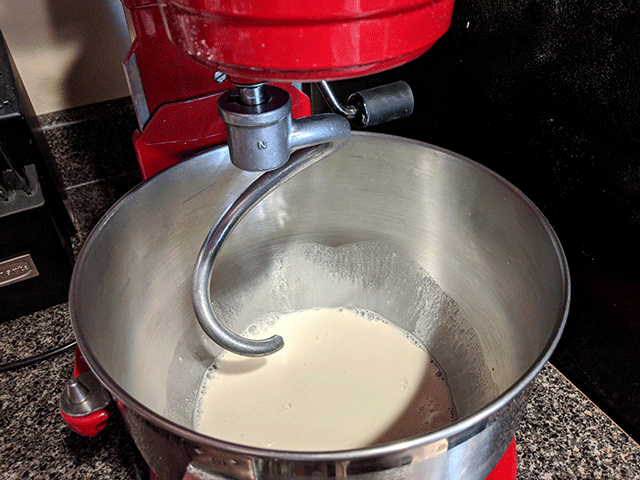
Now for the fun part. Add the salt, sugar, and flour to the mix.
If you are using a standing mixer, turn it on and let it mix things together. After a few minutes, a rough dough will form and pull away from the sides of the bowl. Let the mixer knead your dough for a few minutes longer before turning off the machine. Turn out your dough onto a floured surface for shaping..
If you don’t have a standing mixer, just stir things together until a rough dough forms. Turn out the dough onto a floured surface and knead the dough until smooth. It should feel slightly tacky to the touch. But if it feels sticky, add a little more flour.
Let It Rise
Shape the dough into a smooth ball.
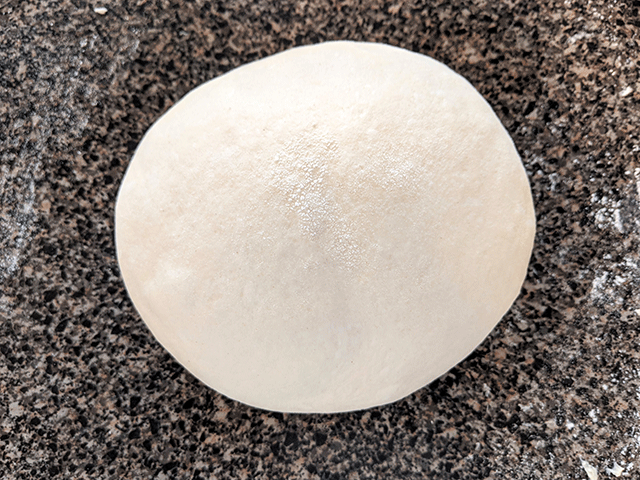
Lightly grease a large bowl. Place your dough ball in the greased bowl and cover with plastic wrap. Let your dough rise until doubled in size.
Depending on your sourdough discard and your yeast, rise time could take anywhere from 1 1/2 hours to 2 hours. Keep a close eye on your dough – you don’t want it to over proof!
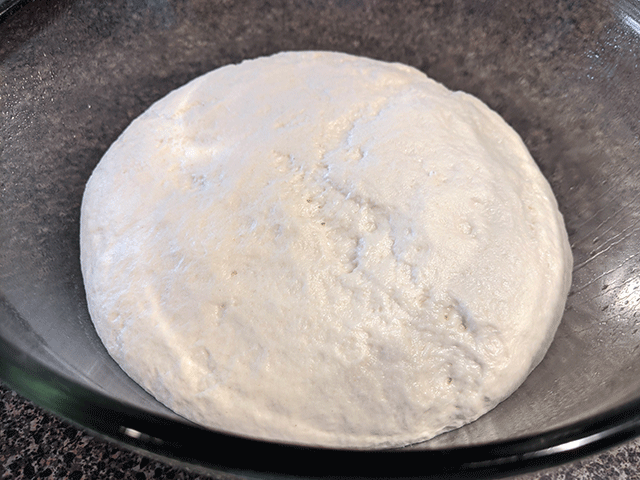
By now, your dough should look much larger and much puffier than when you started. But you’re not quite ready to bake just yet.
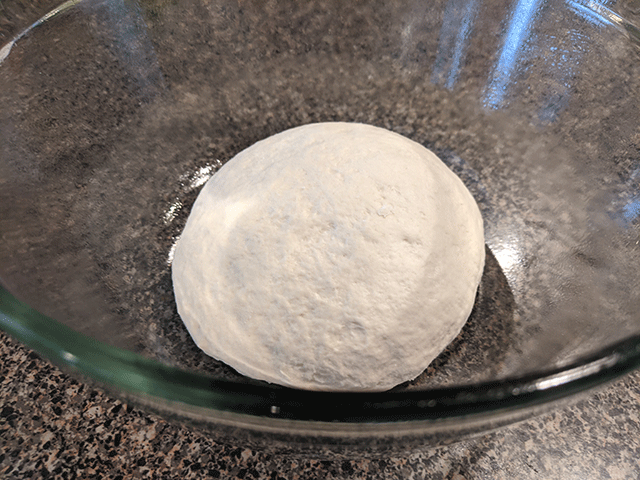
Turn your dough out onto a floured surface. Punch down the dough. Stretch and reshape the dough into a smooth ball again.
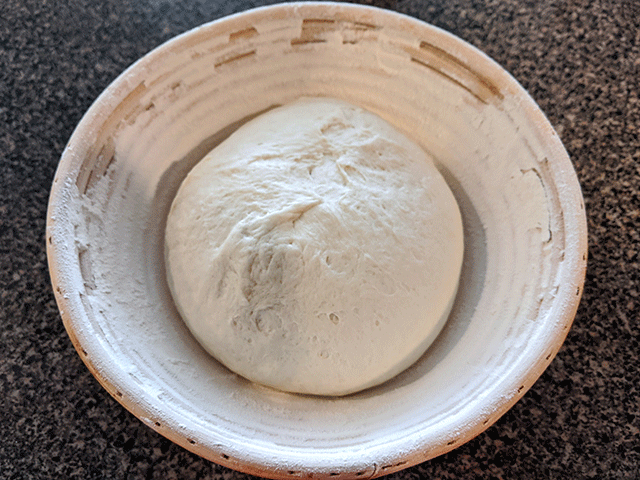
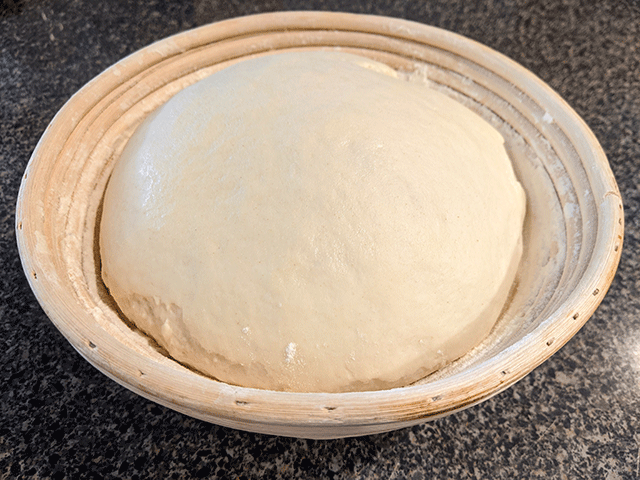
Once you’ve got a good looking dough ball again, set it aside for a moment. Flour a Banneton basket, or a line a bowl with a tea towel and flour it heavily.
Set your ball in the basket with the seam side up. Let your dough rise again until double in size. This rise will go much faster this time. It will only take about 45 minutes to an hour depending on the temperature of your room.
Prep for Baking
While your dough rises, put your Dutch oven with its lid in your oven and set the oven to preheat at 450 degrees Fahrenheit (232 degrees Celsius). You want your Dutch oven to preheat for at least 30 minutes before baking, though 45 minutes would be ideal. Because I tend to forget this step, I get the oven preheating as soon as I put my dough in the Banneton basket.
Once your dough reaches a good size, give it a light poke. If the dough bounces back quickly, it still needs some time to rise. If the dough bounces back slowly, it’s ready to go in the oven. Did your dough collapse? It has over proofed, but you can still cook it anyway (and it will still taste just fine – don’t worry).
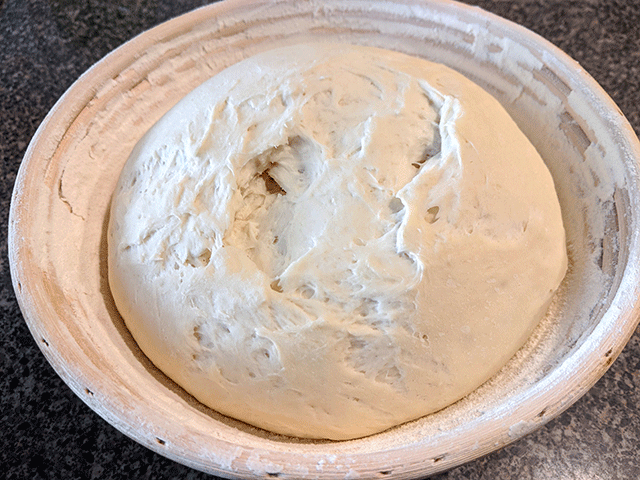
Dutch oven preheated? Dough risen? You’re good to go!
Be careful with the next couple of steps – the Dutch oven will be very hot. I’ve burned myself during this step a few times, so please take some precautions.
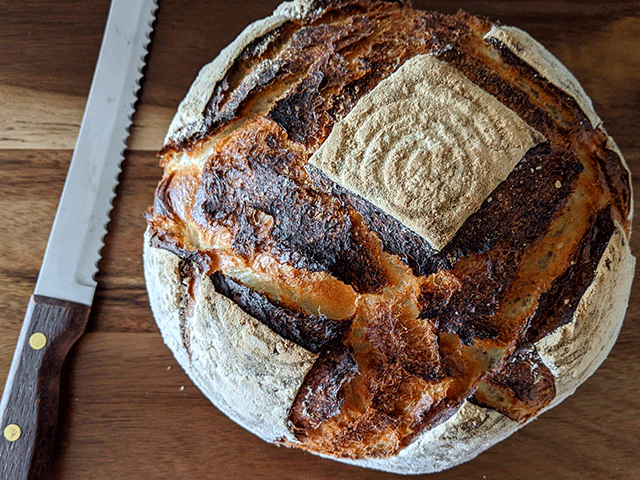
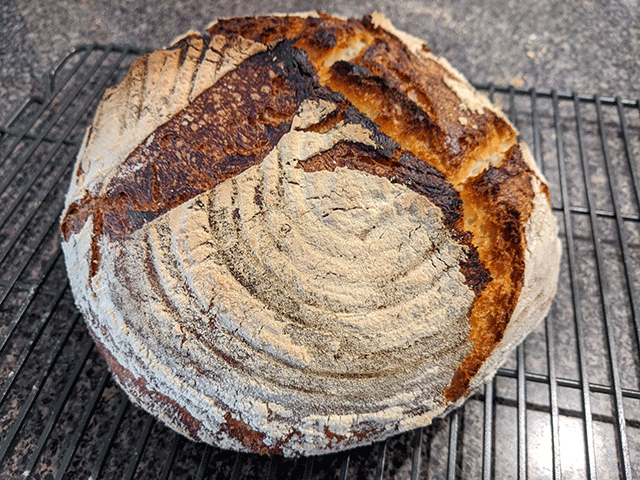
Gently turn your dough out into the Dutch oven. If you put your dough in the Banneton with the seam side up, the seam will now be on the bottom of the Dutch oven and you’ll have pretty flour swirls on top.
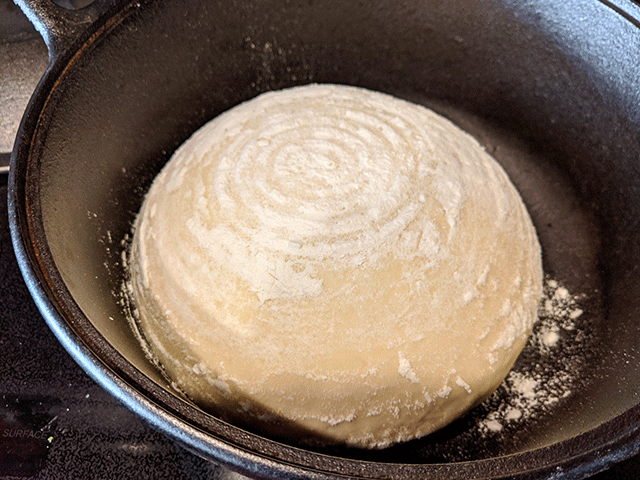
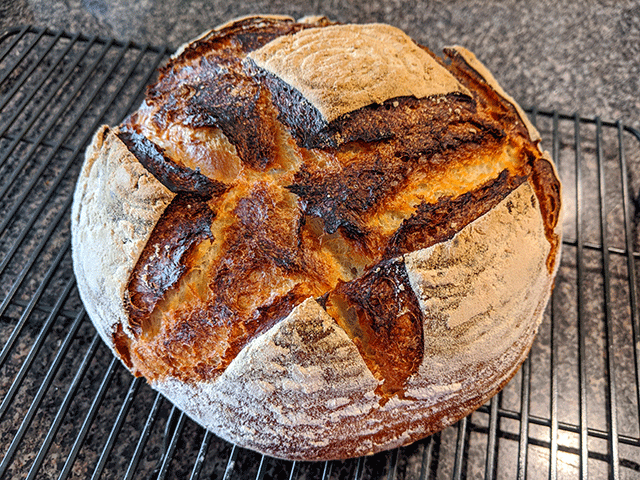
Use a bread lame or a sharp knife to score your dough. I find a hashtag or crosshatch pattern to be the easiest for me. However, you could do a single straight cut down the middle, or you can take a few moments to be fancy and cut some other design into your bread.
Bake Your Bread
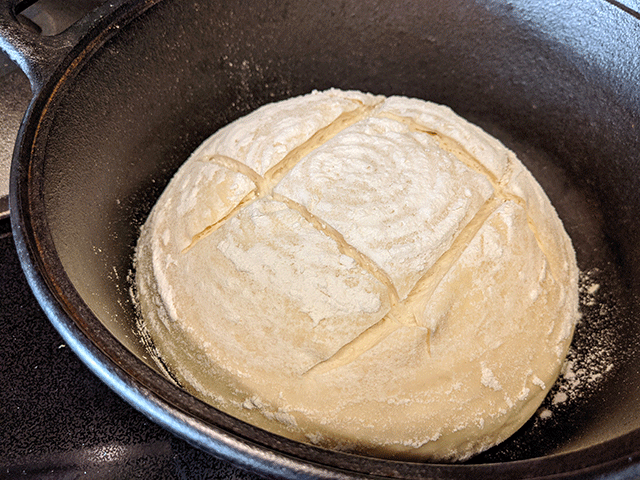
Once you’ve scored the dough, replace the lid on the Dutch oven and put everything into the oven. Bake for 20 minutes.
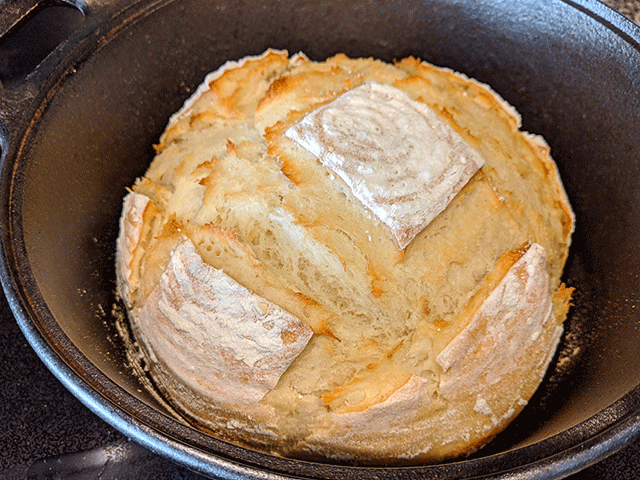
Carefully remove the lid from the Dutch oven. At this stage, your bread hasn’t finished cooking, but it should have risen quickly formed a nice round shape. In this picture, you can see where the bread split along my crosshatch scoring.
Bake without the lid for another 20 to 25 minutes (temperature stays the same).
Let It Cool
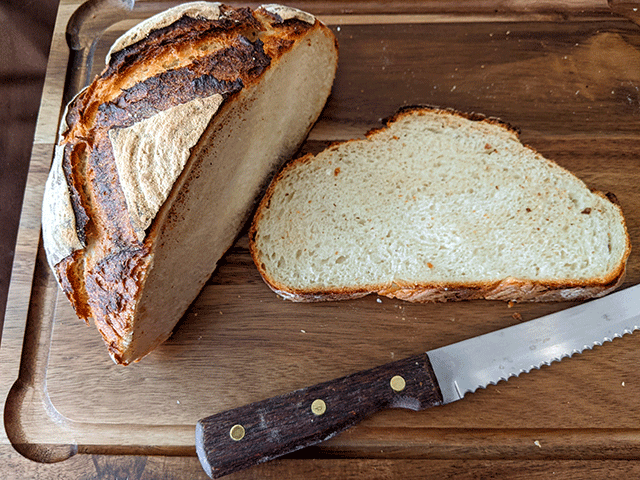
Once your bread has finished baking, turn it out onto a cooling rack. If you thump the bottom of the loaf, it should sound hollow. Your crust should have a nice golden brown color. And if you listen closely, you should hear your bread crackle slightly (like a campfire).
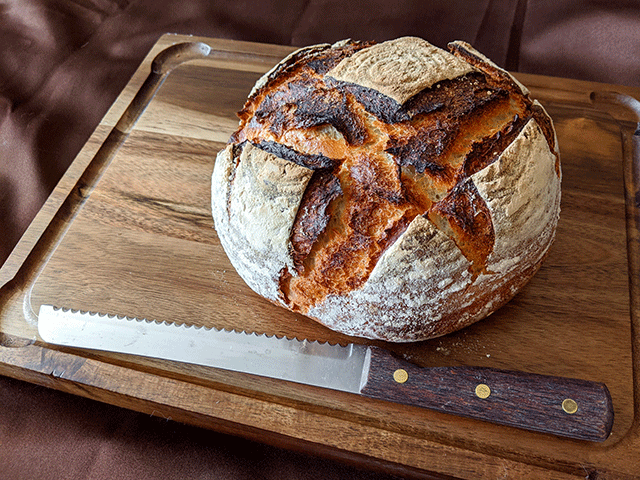
Let your bread cool completely before slicing.
I know it’s tough not to cut into warm bread fresh from the oven, but I’m not joking. Let your bread cool. Although your bread isn’t in the oven anymore, it still retains enough heat to continue baking. If you cut your bread now, the inside may still turn out a little gummy.
And you did it!
You waited for your yeast to activate. You waited for your dough to rise and for your dough to bake. And you waited for your bread to cool.
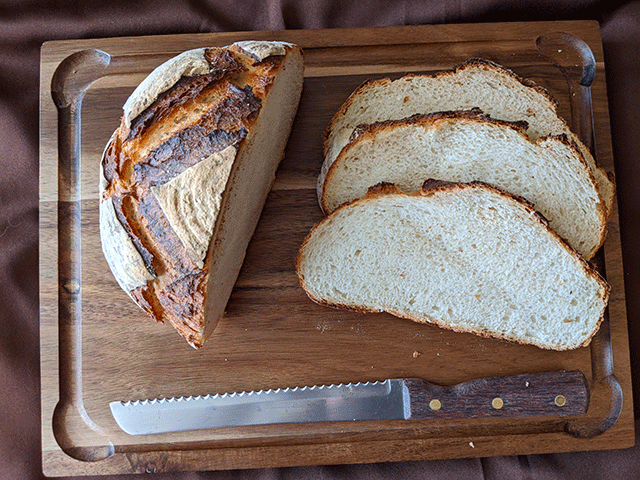
You can now enjoy your perfectly lovely loaf made from sourdough discard.
Seriously. Go ahead and cut it up now. Slice that bad boy and enjoy.
Or you could take a few pictures first for your Instagram or your Facebook and show it off to your friends. I’m sure they will feel jealous of your baking skills.
You could also tell them how easy it was. You made professional, artisan-style sourdough bread – with almost no effort on your part because you are just that amazing.
Or you know, you could share this recipe.
Just the Basics
Sourdough Discard Bread
Ingredients
- 230 Grams Warm Water (1 Cup)
- 4 Grams Dry Active Yeast (1 1/4 Teaspoons)
- 230 Grams Sourdough Starter – Fed, unfed, discard (1 Cup)
- 9 Grams Salt (1 1/2 Teaspoons)
- 8 Grams White Granulated Sugar (2 Teaspoons)
- 300 Grams All-Purpose Flour (2 1/2 Cups)
Instructions
- Combine the yeast and the warm water in a large bowl. Stir until all the grains dissolve. Let side for 10 to 15 minutes.
- Add your sourdough discard and stir until everything dissolves. Let sit for another 10 to 15 minutes.
- Add the salt, sugar, and flour to the mix. Stir until a rough dough forms.
- Turn dough out onto a floured surface and knead until smooth.
- Shape the dough into a round. Place in a lightly greased bowl, cover, and let rise until doubled (about 1 1/2 to 2 hours).
- Turn your dough out onto a floured surface. Punch down the dough. Stretch and reshape the dough into a smooth ball again.
- Flour a Banneton basket, or a line a bowl with a tea towel and flour it heavily.
- Set your ball in the basket with the seam side up. Let your dough rise again until double in size (about 45 minutes to 1 hour).
- While your dough rises, put your Dutch oven with its lid in your oven and set the oven to preheat at 450 ° Fahrenheit (232 ° Celsius).
- Gently turn your dough out into the Dutch oven. Use a bread lame or a sharp knife to score your dough.
- Once you’ve scored the dough, replace the lid on the Dutch oven and put everything into the oven. Bake for 20 minutes.
- Carefully remove the lid from the Dutch oven. Bake without the lid for another 20 to 25 minutes.
- Once your bread has finished baking, turn it out onto a cooling rack and let cool completely before slicing and serving.
Notes
Secrets to Success
I fell in love with this sourdough discard bread recipe the first time I tried it. I loved that it used my sourdough discard so I didn’t have to waste it. And I loved that my bread tasted heavenly the first time around.
I did make one mistake during my first attempt, however. I originally placed my dough ball seam side down in the Banneton basket and let it rise that way.
While it looked nice rising in the bowl, I forgot that the dough ball would need to be flipped before going into the oven.
When it baked, the dough naturally split along the seams, rather than following any scoring pattern I made. It still tasted great – but it just didn’t look as pretty.
If you want your sourdough discard bread to look picture perfect, I recommend putting the dough seam side up (as per the instructions) rather than seam side down.
Other than that – this bread is a winner. Easy to make and yummy to eat.
Nutritional Information
Here’s a quick peek inside my sourdough discard bread recipe:
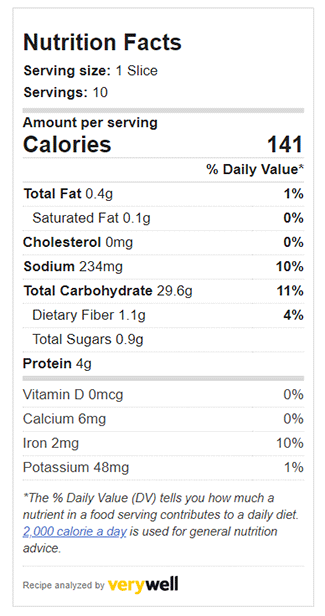
Keep in mind that I averaged about 10 slices in my loaf. Because it was a round loaf, some of the slices were bigger than others. Similarly, you may cut your bread differently than I cut mine, so your calories per serving may vary.
Did You Try It?
I had a lot of fun making this sourdough discard bread, and I am super excited to hear about your bread adventures with it, too. If you try the recipe, let me know what you think in the comments below. And if you have any additional suggestions for making it better, feel free to share that too – I want to know!


This looks delicious! I have been looking all over for an artisan loaf like this that is easy. Thank you. I can’t wait to try it and let you know how it turned out:)
Of course! I hope you enjoy it as much as I do. 🙂
I made it and as others mentioned added extra flour at initial mix. Came out perfectly
Going to sub in some Rye flour next time as the crumb would lend itself perfectly to rye
That’s wonderful to hear! I’m glad you found a consistency that you enjoy. Good luck with the rye flour – I bet it will turn out amazing 🙂
Good basic recipe if you—like me—have a starter that you’re barely keeping alive. One note I’d add is to mind your moisture content.
I’ve made this is a couple of times, and I’ve found that the recommended 1 cup of water to start with can lead to a way over-hydrated dough depending on ambient conditions. My first batch was a slurry even after 10 minutes in the stand mixer—I had to add another cup of flour to get it to the proper consistency.
On my second attempt, I started 1/2 cup of water and added more as needed as the machine kneaded the dough. That did the trick. So live and learn. Both batches produced tasty bread. Good use of discard!
Thank you so much for your feedback! That’s definitely a good point. I found that when I made the recipe with a whole wheat flour starter, I definitely needed more flour to get the right consistency. I also found that I had an easier time getting the right consistency when I measured by weight rather than by volume, as my measuring cups seem to vary a little.
I’m so glad that you enjoyed the recipe and made great bread! That really makes my day 🙂
I found same situation it was slushy and I did weigh everything I ended up adding an additional cup flour I will be baking five loaves tonight I wish I read your comment and reply earlier before making many loaves —-
Hey Lisa – I’m sorry that the consistency wasn’t right for you. I hope your bread still turned out okay in the end.
Had same experience- just added another cup flour to adjust. Hoping the yeast and starter will work – yours baked up ok after adding more flour?
Needed to do something with my overflow of discard! This came out amazing! Made it twice! The first time I followed instructions exactly. Came out great… but it was a little to over cooked for our liking. The second time.. I followed evening except at the end I only baked it for 10 mins without the lid and came out perfect! The kids LOVE this bread! Thanks for sharing!
😀 😀 😀
Followed recipe as described except I used bread flour. The bread was soft inside with a crunchy shell. Easy recipe and delicious!
Thank you for posting this recipe. I also had all that discard and was about to make up my own recipe, but yours gave me a better starting point than my imagination!
In the end, it turned out even better than I had expected. It was flavorful and the crust was wonderfully crunchy. But there were some problems along the way that I’ll share, in case it is helpful.
First, as another person commented, I found the dough way too wet. I wonder if your starter is 100% hydration, i.e. 50/50 flour/water? Assuming it is 100%, I calculated your dough as 76%, which is wetter than my normal 72%. So I ended up adding a lot more flour to get it manageable and able to hold its shape better.
Second, the single stretch & fold did not seem to allow enough time for adequate gluten development. I added a second S&F and it came closer to passing a “window pane” test. I’m not used to recipes with instant yeast in addition to the sourdough starter, so I wasn’t sure what to expect.
Third, I managed to get the dough way overproofed, likely because I’m used to it taking longer without the yeast. This is my mistake, but I wonder if a warning would be helpful to watch it more closely than with regular sourdough. Next time I’ll watch more closely.
Thanks again. I’m glad to know one can make some very good bread with sourdough discard.
Thank you so much! Those are all wonderful tips. Yes this is a higher hydration dough and my starter is currently 40 grams whole wheat flour to 40 grams water. When I first played around with the recipe, my starter was 40 grams all-purpose flour to 40 grams water with each feeding, and there is a difference in consistency. I’m sorry your loaf was overproofed – differences in kitchen temperature can have that effect! I will try to incorporate that warning into my post for future bakers.
Any idea if this would work if it’s shaped into a sandwich loaf and put in with a pan of water instead of the traditional Dutch oven?
I have not tried it! That sounds like a fun idea though. I do have other sourdough discard loaf recipes that do not involve Dutch ovens, so feel free to check those out as well.
Good recipe. Had to add extra flour to get the right consistency. Good rise, good flavor, good use of discard. Great crust, cooking time and temp spot on. Internal temp about 210 at the finish. Next time I’d let it rise a half hour longer on the second rise. Thanks for the recipe.
Oh I’m so glad that you had a positive baking experience. Thanks so much for the feedback!
If you include the liquid in your starter (and you should when calculating hydration), this is well over 100% hydration. Much too wet to form a ball, no matter what flour you use. I added a LOT more flour and it tuned out good. A nice use for a faster bread that uses up starter. I do weigh all my ingredients so that was not an issue.
Hey Kim, thanks for your comment. However, when you include your a starter of 1:1 equal parts flour and water, it doesn’t affect the overall percentage of hydration because you also include the flour in that math. But for a little bit of clarification, let’s take a look, shall we? 300 Grams all purpose flour plus 113 grams of flour from the starter = 413 grams flour. 240 grams water plus 113 grams water from the starter = 353. 353 grams water/ 413 grams flour = 85% hydration.
I can see many beginning bakers struggling with an 85% hydration dough, as many sourdough recipes only recommend between 65% and 75% hydration. However, I have made an entirely whole wheat sourdough recipe with as high as 95% hydration, and though it was difficult, it is still workable. It just takes a little bit of practice.
But just because I like this recipe at 85% hydration doesn’t mean that you have to! If you regularly add more flour to your recipe and you have a hydration percentage that you prefer, maybe weigh out exactly how much extra flour you like to add and then share your preference with others here in the comment section. Other bakers may find your suggestion helpful.
I made this recipe in average once a week! Love it, my hubby inhaled it! I read the comments about the water and start with 1/2 cup and found that by adding a tablespoon or 2 gets me the right consistency. Comes out perfect. I also add garlic powder, grated rosemary to the mix and sprinkle Parmesan cheese on the top when I take the lid off. Yumz! Thank you for an excellent way to use up discard!
Oh that sounds lovely! Thank you for sharing.
I was like a miracle! I’ve been throwing out starter trying to get one going and I decided to try using some of the discard. The bread was gorgeous. And tasted delicious. At this point I don’t care if my starter ever matures. This is terrific!
Oh that’s so wonderful to hear! Thank you so much – I really appreciate your feedback and I’m glad you had a positive baking experience.
this was easy and delicious, made precisely to your recipe. this will be now on regular rotation in my kitchen
Oh thank you so much! I really glad that you enjoyed it 🙂
Very happy with this recipe. I didn’t make any changes other than baking it on a sheet pan instead of a dutch oven (as I do not have one of those). Half of it was gone almost as soon as it got out of the oven. This is going to be my go to sourdough recipe.
YAY! I’m so happy that you liked it 🙂 And that’s clever to use a sheet pan – super resourceful.
Best loaf of bread I’ve managed to bake – my husband is standing over the sink eating another slice as I type this!
Oh that’s so wonderful! You’ve made my day 🙂
Wonderful crumb and crust. I’m used to working with high hydration doughs so the slack texture was not a problem. The only change I made was to sub out 130 g spelt for the white flour. I just really like the taste.
Thanks for a great way to use up the extra starter. Hate throwing any foodstuff away.
Thank you so much for the feedback! That’s great that you can swap out the flours and work the dough easily.
Thought to give your recipe a try! Made my adjustments due to being my brown rice starter and it was fantastic! I just needed a head start and thank you for this recipe <3
Great recipe! I added 1/4 cup more AP flour and it turned out good. Made the recipe double and the loaves are nice and big 🙂
Wonderful! I’m glad you enjoyed them 🙂
Today will be my third time making this bread, I’m happy with the results. I seem to need more flour than the recipe calls, adding a little until it looks like the pictures on your post. Super happy with this much more cost-effective than buying a loaf of sourdough at the grocery store.
Wonderful! I’m so glad that you enjoy my recipe 🙂 Thanks for letting me know that you need a little more flour for the recipe – some starters are wetter than others and a little extra flour can help offset that to create a perfect loaf. Happy baking.
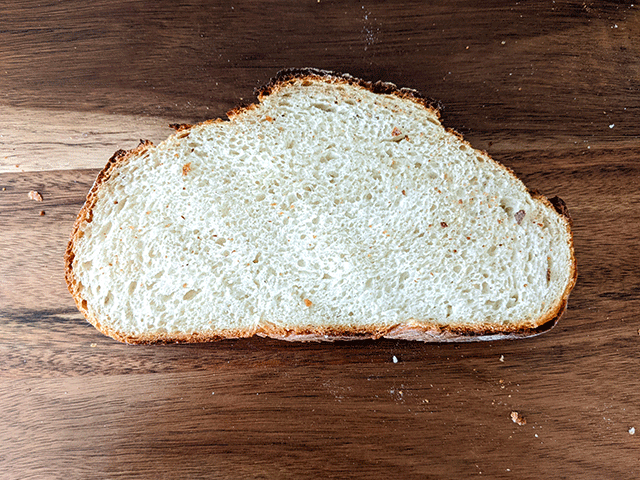
Like others, I needed to add more flour to make the dough workable for me. It did not bother or surprise me, though. I simply added more a bit at a time until I could manage it but still leave it as a fairly hydrated dough. It rose perfectly, each rising being as expected. I judged the 2nd rise by the spring of the dough and put it into the prepared and preheated cast-iron dutch oven when it was ready. The flavor is lovely, the smell perfect, and the loaf rose and colored up just as it should have. Easy recipe. I was a bit surprised at the tiny crumb, having expected a more typical sourdough-like crumb with big holes. Thoughts?
I’m so glad that you were able to make the dough work for you! This loaf does have a smaller, tighter crumb because it uses dry active yeast to give the bread rise and the starter is just for flavor. Dry active yeast works a lot faster than a recipe that solely depends on starter, and the faster rise means a tighter crumb.
Thanks for the reply!
Can I refrigerate after first rise ?
Yes you can, though I wouldn’t do it for too long because it has a lot of dry active yeast to give this bread lift. It doesn’t behave in the same way a traditional artisan loaf (that only uses starter) would. I don’t think I’d let this rise over night or it might over proof. If you do end up refrigerating it and it works for you, let me know about your experience 🙂
Just FYI, whenever I bake typical yeast bread using 50/50 whole wheat to AP flour, I refrigerate my dough for the second rise, and it always works and tastes better. Should not be a problem here. It simply slows down the rising and fermenting process.
Thank you so much for the tip! That’s really helpful. 🙂
I am not a ‘bread’ maker but have made this recipe 2x’s already and love it. I also used an air fryer convection oven without a dutch oven use ng a ceramic bowl and lid. I did make use some of the comments regarding adding water. I started with 1/2 cup and added maybe another 1/4 to get the dough’s consistency to be able to make a ball with the correct smoothness. I have also experimented and made it with cheddar cheese folded in when I did the S&F. SO good, hubby ate it within 24 hrs ! Today’s is being made with pepperoni and Colby Jack/cheddar in the folds when I do the S&F. Also note I used a Bundt pan for the latter, stretching & folding in a rectangle to enable me to wrap within the decorated Bundt pan. SO YUMMY!
That sounds absolutely incredible! Thank you so much for your helpful comment.
Hi there, great recipe. Question. Can the starter be used directly from the refrigerator? Or should it be left on the counter overnight prior to using? I have made this bread three times and use the starter directly from the refrigerator, the bread is delicious but I’m curious if I’m doing it correctly. Thank you
That is a very good question. I’ve always kept my starter on the counter at room temperature when I’ve made this bread. However, the great thing about this recipe is that the starter is only for flavor and the yeast is what gives your bread lift. You don’t need to have an active bubbly starter for this recipe. If you’ve successfully made this bread with starter from the fridge, then you’re doing it right 🙂
Yes, I’ve made the bread and it was fun. I find it a lot easier than the real sourdough bread, but of course I’m just a beginner, it takes a lot of practice. Thank you for sharing this recipe .
Thank you so much for sharing! 🙂
I just finished making this loaf and it was excellent! I did have to add extra flour and I used bread flour. I also did not have active dry yeast but substituted instant yeast. I did a stretch and fold 1 hr after the first rise and continued on with your recipe. I lifted the the final bowl onto a piece of parchment paper lined with flour and cornmeal and dropped the parchment paper down into the hot dutch oven. So much easier for lifting in and out. Reminded me of the bread my grandmother used to make. 4 stars because of needing to add extra flour but after that it’s a 5 star!
Thank you so much for the honest feedback Cassy! I appreciate all the details that will help other bakers improve their bread.
This recipe makes the dough very wet. As others have stated. Hydration is off. Starter hydration is most likely the cause. I also had to add flour to manage the dough. Just enough so dough ball pulls away from bowl. Still sticky but manageable with damp hands. It would be awesome for this recipe to be more detailed. Such as starter hydration.
Hey there, I’m sorry for the confusion. Here’s what I wrote in the ingredients section of my post, though you wouldn’t have seen it in the just the basics section of the recipe. “Keep in mind that you’ll want additional flour for sprinkling, and you may need to adjust your total flour depending on the consistency of your starter. My all-purpose flour starter follows a 1:1 ratio of flour to water. However, I’ve tried this recipe with a whole wheat starter, and I needed a lot more flour to get the consistency I wanted, almost a whole cup.”
Can I use Rapid Rise Instant yeast or do I have to use Active Dry?
Sure thing! Rapid rise and active dry are interchangeable.
I tried baking it in a silicone bread maker just to see how it would turn out after staying so sloppy. Not a huge rise but great crust and great taste! I’ll take into account peoples suggestions re less water for next time though
I’ve never tried a bread maker before. Thank you for letting me know how it turned out!
LOVE LOVE LOVE this bread. It fits our working lifestyle with its short fermenting time. I shy away from sourdough breads that take a 12-18 hour prep.
I’m so glad that you enjoyed my recipe. Thank you!
I’ve been searching for discard recipes that my family will actually eat and this fit the bill! I feed my starter with rye flour for a more sour taste and it makes a much thicker consistency than a starter using other flours. But that ended up working great with this recipe! I made two batches side by side, one with inclusions and one without. The one without was absolutely perfect and though the one with cheddar and jalapeños didn’t rise nearly as much, the taste was still great. I plan on playing with it tomorrow and trying some less wet inclusions and see what happens. Oh, and I used only bread flour as that’s all I had on hand, maybe I’ll try AP next. Thanks again!
That is so wonderful to hear! Thank you so much for all your helpful feedback and for sharing your baking experience. You’ve made my entire week. 🙂
This will be my go-to recipe from now on. I hated throwing away the discard I didn’t have use for. Now I can turn it into a delicious loaf! Fast enough to make if company is coming.
Yay! Thank you so much for the positive feedback.
I’ve made this three times in the past two weeks. It’s a great use of discard!
Echoing what others said, a cup of water was way too much. I heeded the advice the first time around of starting with a half cup, but the second two times I forgot. I had to add a lot of extra flour and still yet resulting in a runny dough like lava. In all cases, the product turned out delicious. The runny dough was just impossible to handle and shape.
But yes, the bread has been great otherwise and I’ll continue making it!
Thank you for your feedback. I really appreciate it.
I need to follow up on this. The water needed has varied a lot for me. I have my starter now so haven’t used this recipe as much, but I did it last week and to my surprise, I needed the whole cup of water or the dough was really stiff. I was confused!
So, I’m just starting with a half cup still with the expectation I may need the whole cup. I say this to whomever it may help.
Just made my second loaf and I love the fact I can use my discard. First time the dough was way too loose but I added extra flour. The second one was perfect. I love this recipe as does my husband. Thank you so much.
That’s wonderful to hear. Thank you for sharing!
I made a double batch of your recipe today. I did have to adjust the flour, but it came out perfect! I baked the loaves in unglazed eartenware loaf pans, using a spritz of water directly on the loaves, plus a pan of water on the bottom rack for steam! I will definitely make this again! In fact it will likely be my go-to recipe for discard.
Oh I bet that extra steam helped a lot! Thank you you so much for sharing.
We loved this bread and the recipe was so easy. Thank you for using standard measures.
I’m a science nerd who has been baking bread for nearly 50 years and still do not us metric measurements.
Of course! I’m so glad you enjoyed my recipe. Thank you for your kind words.
I just want to say, thank you SO MUCH! I’ve been trying for several months to make a sourdough loaf (particularly from sourdough discard) that doesn’t end up imploding on itself and becoming a solid brick in the end. This recipe led to my first successful loaf!! I did everything to the letter. I was worried that my sourdough discard wasn’t active enough because the dough didn’t rise very much at all during proofing but it turned out perfect (was a trust the process moment, though I probably could use slightly more active discard next time, haha). I love that this recipe is more simple than others, and doesn’t require hours and hours of folding/stretching and overnight proofing. I love that it can be made in an afternoon. Thank you again, I’ll be checking out your other recipes!
Your kind words have made my day. Thank you so much for sharing. I’m so happy that you had a positive baking experience.
Can you open bake on a baking sheet instead of dutch oven?
I wouldn’t recommend it – some people do face success open baking their bread but it takes some finesse and understanding of your oven and your bread. A Dutch oven traps stream with the dough to prevent the crust from hardening too soon so you can get a good oven spring. You would need an additional tray to hold water or a specialized oven that injects steam for you. Further more, baking sheets are thin and conduct heat rapidly and often unevenly. You’d need a baking stone for a steady, even distribution of heat. Even if you had both a tray and a baking stone, I haven’t practiced an open bake with this particular recipe so you’d be on your own to get the timing just right.
The bread is in the oven.
I make sourdough often, but I need something quickly.
I saw this and thought I would give it a go.
I used a scale. I followed the directions. It was a goopy mess, no amount of needing would fix it, a cup of flour more and we were nearly there…
Hey Mindy, at the beginning of my post I mention that it often needs an extra cup of flour depending on the consistency of your starter and the flour you’re using. It’s easy to miss but I’m glad you managed to get the results you wanted in the end. I hope your next loaf turns out even better! Thanks for the comment.
my new go to recipe for sour dough. perfect results. used ripe starter though. BUT finished in just on afternoon. thats a big change for me—to bake sourdough on a whim without bulk rise overnight. Modifications: sprinkle sesame seeds, spritz with water before covering the dutch oven. I am using this recipe from now on. thanks so much,
Thank you so much for the tip about the sesame seeds! I appreciate the feedback.
Had some discard to use up so I was looking for some ideas online. Very glad I found this recipe. Ended up with a lovely leaf. I did use a bit more flour than the original recipe. I will definitely use it again. Thank you!
Thank you so much for sharing!
I made it, it taste delicious! The only issue is my bread ended up to dense. Any tips?
Hey Jasmine, I’m so glad your loaf turned out tasty. However, this is kind of a dense bread for two reasons. First, it’s got a lot of commercial yeast to help it rise. The faster the rise, the denser the loaf. Second, it’s not a high hydration loaf. More flour to water ratio means a thicker, chewier bread. If you want a fluffier bread, you could scale back the yeast and let it rise longer, and use more water. Keep in mind that a high hydration loaf can be difficult to shape and can take some practice to get right. I hope these tips help.